Friday 30 November 2018

How to draw star in 3d on paper-step by step tutorial by Art of Rohit

How to draw Star in 3d-step by step tutorials by Art of Rohit
Step by step tutorials for to draw star in 3d on paper, drawing for begginers, kids drawing, easy to draw
Hello friends,today we will going to learn about how to draw star in 3d on paper. Here step by step tutorial for you to draw star in 3d on paper. Before going to start we need this drawing tools for drawing. 

Drawing tools we need

1.Graphite pencils-2b,4b,6b,8b
2.Paper stumps
3.Scale
4.Kneaded eraser
5.White paper

       Important points we must remember

Now friends these are some important points we must remember when we draw the star.
•Pick good reference image for drawing ,So it's give us realistic 3d drawing.
•Try to give shiny texture to the star.
•Use kneaded eraser for to give shiny effects.
•Use darker grade pencils for to highlight the details of star.
So After remembering these points let's start.

how to draw, 3d drawing of star, step by step tutorials

1.First step:Draw outline of star according to your reference image. Here I am drawn outline by the using of 2b graphite pencil with the help of scale. Now let's proceed for another second step

How to draw outline of star

2.Second step:In these steps friend we will draw the line to centre of star according to the reference image from the cone point. The main purpose to draw this lines is to 3d shape to star. After doing this we will proceed for next step.

Step by step tutorials for to draw surface of star in realistic

3.Third step: Draw the surface area of star with the help of 4b or 6b pencil. First we will draw with 4b pencils for lighter shades and add darker shades by drawing with 4b pencils according to the reference image. Here friends darker pencils plays major role in making our drawing realistic.

Easy way to draw star in 3d
4.Fourth step: Blending the star surface area with the help of paper stumps. It will help us to give smooth surface area for star. You can also use tissue papers for blending purpose. Now it will start to look in 3d realistic.

Here step by step tutorials for to draw the star, learn to draw star, 3d drawing star , easy to draw star, begginers drawing, step by step tutorials for to draw star

5.Fifth step: In this step friend's we will using kneaded eraser for to give shiny effects to the star. It will make our drawing more realistic.
Always add shiny effects according to your reference image.

By following all these steps you were easily able to draw star in 3d realistic drawing. For more information watch our video.

   Thank you visiting us, follow us now


Wednesday 28 November 2018

How to draw modern design Cup and Saucer-step by step tutorial

Modern Cup Design Drawing - step by step tutorial by Art of Rohit

How to draw cup and saucer, darwing for kids, learn to draw, design of cup
Hello friend's, here step by step tutorial for to draw cup and saucer in modern design and from this tutorial you will easily get to know about that how to give smooth shade to any object. The main purpose for to make this tutorial is that by following these steps you will easily able to draw any cup or saucer in modern design. So without wasting time let's start.

                  Drawing tools we need

1.Graphite pencils- 2b,4b,6b,8b
2.Paper stumps
3.Scale for outlines
4.White paper

                         Important points

These are some important points we must remember when we draw the cup and saucer.
•First we must remember that when we start  to draw we need to draw outline in accurate manner. •Second is we need to use the paper stumps for to blend the surface area of cup and saucer for smooth texture. •Third point is we need to use darker pencils at last for highlighting the details of cup and saucer drawing. After knowing all the points let's start step by step tutorial.

How to draw outline, grid method

1.First step: we need to draw the outline of modern cup and saucer  by the helf of grid method. We need to draw the outline by using graphite pencils of 0.5 grade, so it's not gave darker outline.

How to draw cup, Drawing for kids

2. Second step: we will sketch the cup and saucer area with the help of 4b or 6b graphite pencils. We need to observe according to the reference image and give the darker and lighter shades for the cup and . Here in some parts like handle of cup adding darker shades and lighter shades according to the reference image. So you will also the design and try to implement in your drawing shade it with your reference image. Now let's proceed for another third steps.

Step by step tutorials for to draw saucer , realistic Drawing

3.Third step: In this step we will going to sketch the saucer surface area by using graphite pencils of 4b or 6b pencils. We need to give darker or lighter shades according to the reference image. Here now i am sketching according to the refrence picture and adding darker shades to the some corner of parts and left half parts of cup according to my   reference picture.

How to blend the Cup and saucer for drawing

4.Fourth step: In this step friend's we will blending the shading area of cup and saucer for smooth texture of cup and saucer drawing.
It helps us to make our drawing more realistic.

 Adding shadow for cup and saucer

5.Fifth step: In this step we will use darker grade pencils like 6b or 8b for highlighting the details of cup and saucer according to the reference picture and adding a shadow texture for the cup and saucer. For more information friends you can watch our drawing video.


           Thanks for visiting us, follow us now

Saturday 24 November 2018

How to draw 3d hole on paper by Art of Rohit

How to draw 3d hole on paper step by step by ArtofRohit

Step by step tutorials, online drawings, optical illusion

Hello friends,here step by step tutorials for to draw 3d hole on paper. We will draw it with the help of one point perspective method and try to give shadow effect for the square or rectangular boxes.So let's start

Stationery tools we need:


1.Graphite pencils -2b,4b,6b,8b
2.Black marker
3.Scale 
4.Blendings stumps
5.White paper
                   

                    Important points:

  These are some important points we must remember when we going to draw 3d hole.First we need to make the structure of the wall or boxes by using one point perspective method. Second we need to give shadow shade for the boxes from certain angle so it's help us to make it realistic drawing. Another important point is we need to sketch the hole with the black marker so it's look deep. After remembering these we can proceed for to draw the 3d hole drawing.


Drawing straight square coloumns with the help of scale

1.First step: we draw square coloumns on paper with the help of scale. Here we are using 2b graphite pencils for to draw after drawing the square coloumns we can proceed for further steps.

Step by step tutorials, online drawings,

2.Second step: we draw the structure and shape of the hole . Here we are drawing with the help of square coloumns and dark the shape or structure of hole  with the help of 4b graphite pencils.

Drawing hole wall by using one point perspectives

3.Third step: we need to draw the hole wall by using the one point perspectives. Here we take one point perspectives at downward centre point and give the structure of wall and here we give height to he wall at certain size by using draw straight line by keeping certain distance of main structure. By following these steps we give proper structure to the walls.

Here drawing square or rectangular boxes by using one point perspectives

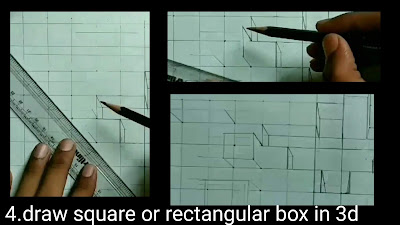
4.Fouth step: we draw the square or rectangular boxes in 3d on paper. Here again we can draw the height of square or rectangular boxes by using one point perspectives and match all lines of upper surface of square, by following these steps we draw all the rectangular or square shape of boxes in 3d.

How to draw outlines of to draw 3d drawing

5.Fifth step: we dark the outline by using black marker of the surface of square and rectangular boxes and also square coloumns of surface because it's help to make it realistic.

How to draw deep hole on paper Step by step tutorials

6.Sixth step: we draw the deep of wall by using the black marker and it will help us to gave the depth of hole and shade the wall of  height surface area with 6b pencil and blend it with blending stumps and give smooth texture the walls.

Step by step tutorials for to draw walls , draw shadow to the boxes

7.Seventh step: we draw the walls of square boxes by using 6b or 8b graphite pencils and blend the surface of the walls of square boxes by using blending stumps. Friend's we need to add shadow for the boxes so we draw the shadow area by using 4b pencil and blend it for smooth texture. We draw shadow from angle from certain side it helps us to make it realistic 3d hole drawing.

I hope you will understand to draw the 3d hole drawing and you can easily draw it by following these steps. For more information watch our step by step darwing video


Thank you for visiting us, follow us now


Thursday 22 November 2018

How to draw wooden house scenery drawing step by step tutorials

How to draw Wooden House scenery on paper with graphite pencils step by step by ArtofRohit


Hello friends,here step by step tutorial and guidance for to draw the wooden  house scenery drawing. For to draw the house select the reference house picture otherwise create  house structure in your mind with  your own creativity. Here we will going to draw thiswooden house scenery drawing.
 
                How to draw house scenery drawing, step by step guide 

Things we need:

1. Drawing graphite pencils- 2b,4b,6b,8b 
2. Charcoal pencils soft
3. Blending stumps and tissue papers
4. White paper

                      Important points

Some important points we must remember when we going to draw. Here are these points:
•Draw the  outline with light grade pencils 
•Draw sky clouds with the help of darker pencils.
•Try to give wooden texture shade on roof and wall with the help of pencils when we draw wooden house
•Realise all the details of house and  draw the details with the pencil

How to draw outlines, house outline, outline for houses

1. First we will draw the outline of wooden house by using 0.5 or hb graphite pencils. We need to take care that when we draw the outline of roofs,walls and gate that we need to give recantuglar shape to he roof and wall that it gives us look wooden ply or wooden walls. By following these steps we will complete the first step and proceed to second step.

How to draw lighter shades, 2b pencil shading

2.Second step: we will draw the lighter shades of the house with the help of 2b graphite pencils. Start to shading the roof surface first and then proceed to the walls, windows, gate and the object exists in your scenery. Observe where the lighter shades needed in your drawings and draw according to the reference image.

How to draw windows, gate , step by step guide, tutorials online drawings

3.Third step: we draw the walls, windows and gate for the house by using 4b graphite pencils . One thing we must remember when we draw the walls,windows and gate for the house we need to give the  wooden texture by using pencils and it's helps us to make house look more realistic.

Usings darkers pencils for to draw outlines for to highlight the details

4.Fourth step: here friends we will dark the outlines by using 8b pencils and it will help us to give the relastic look for the wooden house.

Blending with blending stumps on house

5.Fifth step: we will blend the shading areas with the help of blending stumps and tissue papers. The main purpose for to blend that it will help us to give smooth shading areas 
and started to looks more realistic.

How to draw background of scenery drawing, step by step guide

6.Sixth step: Now friends we will draw the background areas for our scenery drawing. Here I am drawn sky with the help of charcoal pencils and then blend it with the of blending stumps for smooth shading and apply more darker shades for darker skies and floors.

Now friends our wooden scenery house drawing is completed. By following this steps you can draw the house scenery drawing easily and make it to looks realistic. For more information you can watch our step by step video


Thanks for visiting us

Saturday 17 November 2018

How to draw wooden texture on house by using graphite pencils

How to draw wooden texture on house by using graphite pencil by Artofrohit

How to draw wooden texture house drawing , learn to draw wooden texture house, drawings for begginers

Hello guys,here step by step tutorial for to draw wooden texture on house by using graphite pencils on paper.
Before going to draw the wooden texture on house we need these things or tools:
1.Graphite pencils-2b,4b,6b,8b
2.Blending stumps or tissue papers
3.Scale 
4.White paper

We draw the house structure by using scale or pencils and give wooden shape to the wall&roof of house.Try to draw the house walls in recantuglar shapes and it gives shape of wooden ply. Before going to start drawing the wooden texture of house remember these points.

Important points
Some points you must remember is to draw the house with the help of scale so it became easy to draw the shape of wood and wood came in proper shape. Use 4b and 6b for darker shades. Guys these are important points which must be followed to draw proper wooden texture

Guys after knowing important facts let's start the step by step process to draw the wooden texture of house.

Outline drawn of house by using scale or pencils, how to draw house
1.First we draw the house outline by using the help of scale or free hand and draw the shape of wooden blocks on roof and walls in recantuglar shape  according to your size or shape of wooden wall.

Drawing with 2b or 4b pencil and giving the first layer of wooden texture
2.Second step friend's is we draw and shade the roof and wall of house. For to Shading the roof first we shade the half area of roof with 2b or 4b pencils. After doing this we blend the roof or wall by using tisdti paper and try to give smooth shading. Our first step is complete and proceed for the second step.

Adding darker shades and giving realistic texture of wood to the house by using graphite pencils
3.Third step is to give the darker shades of the some half areas of roofs and walls according to the wood texture. In the third image the adding darker shade texture on the roof surface with the help of 6b or 8b pencils and we apply the same process to the walls of house. When we going to shade the wooden walls we need to shade the darker areas of the wall with the help of 8b or 6b pencil. One thing important when we going to Shading the walls we need to maintain some gap with darker areas and it helps us to give realistic texture shade. It's plays major role to make wooden house drawing looks much more realistic.

Here completeing my drawing by using the same process
4.Fourth step is we complete the whole wooden house drawing by using the 8b pencils and shade all darker areas of house ground,walls and roofs of the house and observe all the details fill in to the drawing and make it more realistic.
Finally our wooden house drawing is completed and friend's it starts to look realistic. By using all these steps we can easily draw the wooden texture on houses. For more information you can watch our step by step video.


I hope friends it's helps you alot to understand the drawing of wooden house and you will be able know to draw how to give texture of wood on houses. For more start to follow us friends.
Thanks for visiting us.


Saturday 10 November 2018

How to draw Jawaherlal Nehru step by step

JAWAHERLAL NEHRU Potrait Drawing -step by step by Art of Rohit

Drawing potrait sketch of Jawaherlal Nehru on paper size29.7x21cm with the pencil of 0.5bpencil for to draw outline and 2b,4b,6b pencils  for to shading  and 8b or 10b pencils for highlighting the darker areas like eyebrows ,lips,hairs and in some areas of ears for darker shades and use blending stumps for to blend the shading areas.It will helps us to make our potraits drawing more professional .Now here is step by step tips and tricks for to draw potrait sketch of Jawaherlal Nehru.

Potrait sketch drawing of Jawaherlal Nehru

•First step-Draw outline of your reference image of potrait. Draw outline by using 0.5 or 0.7 graphite pencil or by mechanical pencil
with the help of grid method
In progress drawing
•Second step-Draw darker areas of eyes by using 8b or 6b  graphite pencil according to the refrence image. 

In progress drawing
•Third step-Blend the darker areas with the help of blending stumps and try to match with the reference image and draw the darker areas with 10b pencil.
In progress drawing
•Fourth step-Draw eye wrinkles with help of 8b,or 10b pencil and shade the wrinkles area with of blending stumps or with tissue paper also.
In progress image
•Fifth step-Draw the ears with the help of 4b or 2b pencil and draw the draker areas of ear with 6b or 8b pencils and shade ear with the  help of blending stumps

In progress drawing
•Sixth steps-Draw the skin texture of face by using 4b or 6b pencils and shade the face area with the help of blending stumps and tissue papers.
In progress drawing
•Seventh steps-Draw the hairs with the help of pencils of 4b or 2b .According to the reference image add shade with the help of blending stumps.
In progress drawing
•Eighth step-Drawing the topi according to the reference image by using 2b or 4b pencil and shading with the blending stumps.
In progress drawing
•Ninth steps-Drawing the clothes according to the refrence image by using 2b or 4b pencil and shade the clothes with blending stumps.
Step by step drawing sketch of Jawaherlal Nehru
•Tenth steps-Complete all the details and draw the darker areas with the help of 10b pencil and shade the areas with blending stumps.

 Realise all the details and complete the potrait drawing according to the reference image.
Watch video for more information.

Thank you for visiting us

Featured posts

Essential Drawing Tools and Materials for begginers - Top 10 list

    Basic drawing tools and accessories for begginers - by Art of Rohit  Hello friend's, today I will tell you and discuss about b...

Popular posts