Monday 31 December 2018

How to draw '2019' in 3D on paper with pencils - step by step tutorial

'2019' 3D Drawing - step by step tutorial by Art of Rohit


2019 3d drawing, happy new year 2019, 3d drawing of 2019, how to draw 2019 on paper , learn to draw 2019, step by step tutorial for to draw 2019

Hello friend's, once again welcome to our new drawing tutorial blog. First of all friend's I wish you a very happy new year so I decided to make drawing tutorial on drawing of  2019 number in 3D from graphite pencils on paper. Before we start step by step tutorial let's know the drawing tools we need for to draw.

                   Drawing tools we need

1.Graphite pencils - 2b,4b,6b & 8b
2.Paperstumps
3.Scale
4.Paper cutter 
5.white paper

                        Important points

These are some important points we must remember when we are going to draw 2019 numbers in 3D from graphite pencils.

• Use darker grade pencils for in some parts of drawing according to the reference image.
•Draw outline with the help of grid method for proper outline of 2019 otherwise you can draw with freehand also.
•Cut paper into half parts by lefting drawing from lower part of white paper.

After knowing all this important points let's start our step by step tutorial for to draw 3D drawing of 2019.

2019 3d drawing, happy new year 2019, 3d drawing of 2019, how to draw 2019 on paper , learn to draw 2019, step by step tutorial for to draw 2019

1.First step: In the first friends we will draw outline of 2019. For to draw outline use grid method for proper outline and use 0.5mm pencils for lighter outline.

2019 3d drawing, happy new year 2019, 3d drawing of 2019, how to draw 2019 on paper , learn to draw 2019, step by step tutorial for to draw 2019

2.Second step: In this step friend's we will draw straight towards below the paper according to the angle of 3D image. Every line must be having Same length here I am taken 4cm for to draw straight line.

2019 3d drawing, happy new year 2019, 3d drawing of 2019, how to draw 2019 on paper , learn to draw 2019, step by step tutorial for to draw 2019

3.Third step: In this step friend's we will shade 2019 according to reference image. First shade the outer walls with the help of 4b pencils and then shade the corner of walls with the help of 6b pencils. It's helps a lot to give 3d look in our drawing.

2019 3d drawing, happy new year 2019, 3d drawing of 2019, how to draw 2019 on paper , learn to draw 2019, step by step tutorial for to draw 2019

4. Fourth step: At last step friend's we will cut paper into half parts for 3D look. We should take care that we need to remove upper part of white paper without cutting drawing. After this our drawing started to look in 3D

I hope friend's you will understand to draw 2019 in 3D from graphite pencils on paper. Also visit 3d tutorials blog. For more information you can watch our YouTube videos.


Thank you for visiting, us follow us now


Sunday 30 December 2018

'G' 3D Drawing on paper with graphite pencils - step by step tutorial by Art of Rohit

'G' Floating word 3D Drawing -step by step tutorial by Art of Rohit
How to draw 3D drawing of G, G 3D drawing, 3D letters drawing ,how to draw 3D letters, drawing for kids, drawing for beginners, sketching tutorials, online tutorials,

Hello friend's, once again welcome to our new 3d drawing tutorial blog. Today we will learn to draw 'G' floating word in 3D in just four steps. Before we start step by step tutorial  let's know the drawing tools we need for to draw 3d drawing of 'G'.

                   Drawing tools we need

1.Graphite pencils - 2b,4b & 10b
2.Scale
3.Paperstumps 
4.White paper

                         Important points

These are some important points we must remember when we are going to draw 3D drawing of 'G' or any letters:

•Always try to draw shadow texture for your 3d letters drawing because it's play major role for to give 3d look and make view like that object having some distance from surface.
•Blend the 3D drawing with the help of paperstumps for smooth texture.
•Draw outline with the help of grid method or if you able too draw it with freehand you can.

After knowing all this important points let's start step by step tutorial for to draw 'G' 3D drawing.

'G' 3d drawing, step by step tutorial, how to draw 3d letters drawing drawing, how to draw outline, step by step instructions, 'G' outline

1.First step: In first step friend's we will draw outline of 'G' word first with freehand or you can use grid method for proper outline as per your need. Here I am using 0.5mm pencil for to draw outline.

How to draw G, step by step tutorial of 'G', easy Drawing tutorial, begginers drawing of G, easy drawing guides, how to draw'G', step by step guide

2.Second step: In this step friend's we will draw straight line towards below and it will be at least 2-4cm. Line should be drawn from the ending outline part of 'G'. For to draw you can use 0.5mm pencils for light outline.

How to draw shadow texture for letters, easy tutorial for to draw 3d , step by step instructions of G, easy tutorial of G, 3d shadow of drawing, step by step guide of shadow texture, guide for shadow texture drawing, easy drawing tutorial,

3.Third step:In this step guys we will draw shadow texture for drawing. Once again we will draw straight line towards below and match all the line of lower part. So it's form the shape of 'G' and erase the straight lines. Then we shade the lower 'G' word with the help of 10b pencils or you can use charcoal pencils also.

How to draw 'g' 3d Drawing, step by step tutorial of 'G' drawing, learn to'G' , drawing for begginers, sketching tips, how to shade G

4.Fourth step: At last step friend's we will shade the outer or inner surface of 'G' word. 
For shading you can use 4b or 6b pencils.
First we shade the surface with 4b surface and then use 6b pencils according to image. After shading we will blend it with the help of paper stumps.

I hope friend's you will understand to draw 'G' word in 3d by using graphite pencils. For more information you can watch our YouTube videos.


Thank you for visiting us, follow us now


Friday 28 December 2018

How to draw Pearl Ring from graphite pencils on paper - step by step tutorial

PEARL Ring 3D Drawing - step by step tutorial by Art of Rohit
Ring drawing, pearl ring drawing, step by step tutorial for to draw ring, how to draw pearl ring, drawing for kids, easy drawing for kids, drawing for begginers, online drawing classes, 3d pearl drawing

Hello friend's, once again welcome to our new drawing tutorial. Today we will learn to draw Pearl Ring in 3D from graphite pencils on paper. So before we start step by step tutorial let's know the drawing tools we need for to draw pearl ring.

Drawing tools we need

1.Graphite pencils - 2b,4b,6b & 8b
2.Paperstumps
3.Scale
4.Paper cutter
5.White paper

                         Important points

These are some important points we must remember when we are going to draw 3d drawing of pearl ring:
•Draw shiny texture on pearl by using eraser & you draw square on pearl shaded area using eraser.
•Use darker grade pencils for adding details in some parts of ring.
•Don't forget to draw shadow texture for ring and also cut white paper into half parts by using scale with lefting ring drawing with lower papersides.
After knowing all this important points let's start our step by step drawing tutorial of pearl ring.

How to draw pearl ring, step by step tutorial how to draw outline of ring,step by step drawing of ring, 3d drawing of ring,easy drawing for kids, drawing for class 8,easy way of drawing ring,beginners guide,online drawing courses

1.First step: In first steps friend we will draw the outline of pearl ring. Here I am using 0.5mm pencils for to draw outline and you can use grid method for to draw proper outline.

How to draw 3d pearl ring drawing, step by step tutorial of pearl ring, easy Drawing of pearl ring , realistic ring drawing,

2.Second step: In this step friend's we will draw the lighter shade of pearl ring. Draw lighter shades by using 2b or 4b graphite pencils and shade according to the ring reference image.

How to shade darker areas, how to draw pearl ring, step by step tutorial for to draw ring, begginers drawing, easy drawing for kids, drawing tutorial

3.Third step: In this step friend's we will shade the darker areas of ring. For drawing darker areas use 6b or 8b pencils. Here I am drawing darker areas according to the reference image of pearl ring.

How to draw pearl ring drawing, step by step tutorial for to draw ring, drawing tips and tricks, easy drawing, drawing for kids

4.Fourth step: In this step friend's we will draw the shadow texture for pearl ring. First I am shaded some areas below the ring by using 2b pencils and then blend it with the help of paper stumps for smooth texture. Also blend some parts of ring according to the reference image for smooth texture.

Cutting paper for 3d drawing of pearl ring, pearl ring drawing step by step tutorial, easy drawing for kids, begginers drawing, online drawing, drawingclasses

5.Fifth step: Now friend's we will cut the white paper into half parts by using the scale. When we are going to cut the paper into half parts  we must take care that we don't need to cut pearl ring. We need to remove upper sider white by lefting ring drawing with lower side paper. So it's will gives us 3d view of pearl ring.

So I hope friend's you will understand to draw pearl ring drawing with the help of graphite pencils. For more information you can watch our YouTube videos & also visit our new drawing tutorial blogs.


Thank you for visiting us, follow us now


Monday 24 December 2018

How to draw SANTA CLAUS with pencils on paper - step by step tutorial by Art of Rohit

SANTA CLAUS Drawing - step by step tutorial by Art of Rohit


How to draw Santa Claus, step by step tutorial for to draw Santa Claus, potrait drawing tutorial, easy drawing of Santa Claus, how to draw santa, easy step tutorial for to draw Santa Claus

Hello friends,if you want to learn to draw Santa Claus with pencils on white paper here is step by step tutorial for you. Once again guys welcome to our new drawing tutorial blog for Christmas day. Before we start step by step tutorial let's know the drawing tools we need for to draw Santa Claus.

Drawing tools we need

1.Graphite pencils - 6b & 8b
2.Mechanical pencils - 0.5mm
3.Charcol pencils
4.White paper

                        Important points

These are some important points we must remember when we are going to draw Santa Claus on white paper:
•Here I am drawing Santa claus by using only darker grade pencils but you can use lighter grade pencils for light skin texture shade in face.
•Cap,beard, & moustache of Santa are most important part of drawing because its symbolise the Santa Claus face so draw it properly.
•You can draw outline with the help of grid method but friend's here I have drawn with freehand.
So friend's after knowing all this important points let's start our step by step tutorial for to draw Santa Claus for Christmas.

How to draw snata claus, santa eyes and nose outline, step by step tutorial for to draw Santa Claus, step by step tutorial for to draw Santa Claus, easy drawing of Santa Claus, online drawing classes,

1.First step: In first step friend's we will draw the outline of eyes and nose with the help of 0.5mm mechanical pencil. You can draw outline with the help of grid method or by freehand also.

How to draw Santa Claus, step by step tutorial for to draw Santa Claus, easy drawing tutorial, drawing for kids, learn to draw Santa Claus, easy Drawing of Santa Claus

2.Second step: In this step friend's we will draw the eyes,nose,lips & moustache by using only one graphite pencil of grade 8b. So shade the eyes,nose,lips or moustache by using 8b pencils according to the image.

How to draw Santa Claus, step by step tutorial for to draw Santa Claus, easy drawing of Santa Claus, online drawing,

3.Third step: In this step we will draw beard part which is below the lips. For to draw use 8b pencils. Draw line according to the image or imagine own image of Santa Claus and draw it.

How to draw Santa Claus, step by step tutorial for to draw Santa Claus, easy drawing of Santa Claus, online drawing,

4.Fourth step: In fourth step we will draw cap and eyebrows for Santa Claus. First we will draw cotton ball structure of cap and then shade the cap by using 8b pencils. After drawing cap we will draw eyebrows for Santa Claus. Draw eyebrows according to the image.

How to draw Santa Claus, step by step tutorial for to draw Santa Claus, easy drawing of Santa Claus, online drawing,


5.Fifth Step: In last step friend's we will draw the beard according to the shape of beard of snata claus or use image for proper shape of santa claus. For to draw beard use 8b pencils and shade it properly according to the image use line structure for details.

I hope friend's you will be able to understand to draw Santa Claus  by using pencils on white paper. For more information you can watch our YouTube videos.

Thank you for visiting us,follow us now


Sunday 23 December 2018

How to draw broken walls in few steps - step by step tutorial

Broken WALL Drawing- step by step tutorial by Art of Rohit

How to draw broken walls, step by step tutorial for to draw broken walls, easy Drawing, easy drawing for kids, drawing for learning

Hello friend's,once again welcome to our new interesting drawing tutorial blog. Today we will learn to draw broken wall on white paper with the help of graphite pencils. Before we start let's know the drawing tools we need for to draw the broken wall.

Drawing tools we need

1.Graphite pencils - 2b,4b,6b & 8b
2.Mechanical pencil
3.paperstumps
4.White paper

                         Important points

These are some important points we must remember when we are going to draw broken walls on white paper:
•First try to draw the broken wall structure and shade it according to the reference broken wall image.
•Draw the crack walls by using the mechanical pencil for to drawing proper crack details on wall.
•Try to use paperstumps for to give smooth texture on broken walls.
After knowing all this important points let's start step by step tutorial for to draw broken wall on white paper.

Drawing broken walls, step by step tutorial for to draw broken walls, easy drawing of broken walls, easy drawing for kids, walls structure draw

1.First step: In this step friend's we will draw the outline of broken walls. Here for to draw the outlines I am using mechanical pencil 0.5mm and shade it with the help of 2b pencils.

Cracked wall drawing, step by step tutorial for to draw walls, how to draw walls, easy to draw walls structure, walls Drawing

2.Second step: In this step friend's we will draw the cracked wall structure with the help of mechanical pencil. Draw with the help of reference image otherwise use lightning structure for proper cracked wall drawing.

Step by step tutorial for to draw broken walls, cracked wall structure drawing, easy drawing for kids, learn to draw

3.Third step: Here we will shade the broken walls by using 4b pencils. First we will draw recantuglar block of different or irregular sizes on paper and shade it pencils. This will help us alot to give relastic drawing of broken walls. Also remember that you must have to left centre point for hole structure

Blending broken walls for smooth texture, how to draw broken walls, step by step tutorial of crack wall drawing, drawing for kids, easy drawing for kids, crack wall

4.Fourth step: At last step friend's we will blend the broken walls for smooth texture. For blending you can use paper stumps or tissue paper. Also add some details by using darker grade pencils like 6b or 8b. By using this four steps friend's you will be easily able to draw it.

I hope friend's you will be able  to understand to draw the broken walls for more information you can watch our YouTube video


Thank you for visiting us, follow now


Thursday 20 December 2018

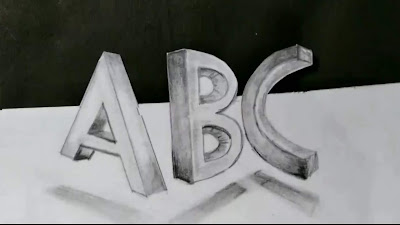
How to draw 'ABC' in 3D from graphite pencils - step by step tutorial by Art of Rohit

'ABC' 3D Drawing tutorial by Art of Rohit

Words 3d drawing, ABC Drawing, Two point perspectives drawing, how to draw 3d words from Graphite pencils, online drawing classes, 3d drawing tutorial, drawing for kids, easy to draw

Hello friend's, once again welcome to our new drawing tutorial blog. Today we will learn to draw 'ABC' in 3D with the help of two point perspectives method. The main motive of this tutorial blog is to give you proper information about the 3d drawings and before we start let's know the drawing tools we need for to draw the 'ABC' 3D drawing.

Drawing tools 

1.Graphite pencils - 2b,4b,6b & 8b
2.Scale
3.Paperstumps
4.Papercutter
5.Eraser

                         Important points

These are some important points we must remember when we are going to draw the 'ABC' 3D drawing:
•Always try to draw with the help of two point perspectives method when you are going to draw words in 3D.
•Give shadow texture to 3D words according to the reference word images or with the help of two point perspectives.
•Cut the white into half part by lefting words from other paper sides. It's help alot to give 3D view.
After knowing all the this important points let's start our step by step tutorial for to draw 'ABC' in 3D.

How to draw line from graphite pencil, 3d drawings of words, words 3d drawing, step by step tutorial,drawing for kids, easy to draw,

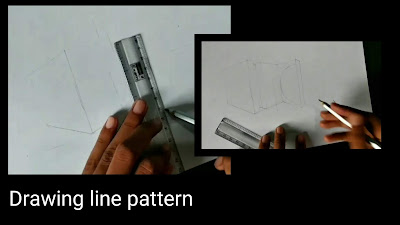
1.First step: In the first step friend's we will draw the line patterns. Her I am drawing the line patterns with the help of two point perspectives and using 0.5mm pencils.

How to draw ABC, step by step tutorial for to draw 3d words,3d words drawing, easy to draw, drawing for kids, easy drawing, 3d drawings

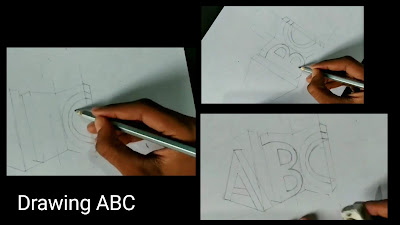
2.Second step: Here I am drawing 'ABC' with the help of scale and drawing 'ABC' on the line which is drawn by the help of two point perspectives. Your words 3D drawing line always according to the two point perspectives for proper shape.

3d words drawing, drawing of ABC, easy to draw, drawing for kids, words drawing , Art of Rohit

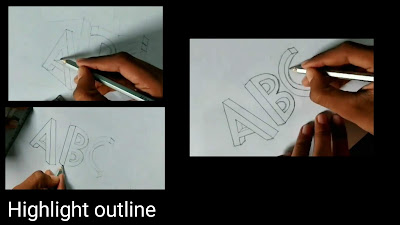
3.Third step: In this step friend's we will dark the outline of 'ABC' and erase all the extra line with the help of eraser. For dark the outlines use 8b grade pencils.

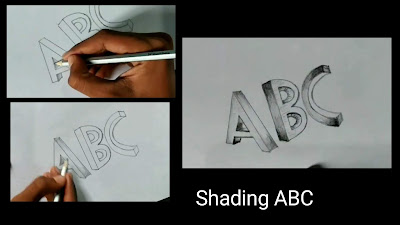
How to shade words, shading ABC, graphite pencils drawing, 3d drawing of words, easy to draw, drawing for kids, learn to draw words

4.Fourth step:In this step friend's we will do one of the important work is to shading the words. For shading first use 4b grade pencils for lighter shades and use 6b grade pencils for darker shades according to the reference image.

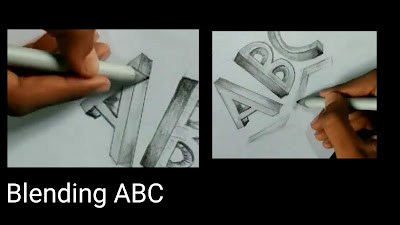
How to draw shadow texture for words, easy drawing for kids, how to draw shadow, words drawing, blending the drawing, easy drawing, online drawing classes, step by step tutorial for to draw words

5.Fifth step:In this step friend's we will draw the shadow texture and blend the words drawing for smooth texture. Draw shadow below the drawing according to the two point perspectives and blend the words with the help of paperstumps.

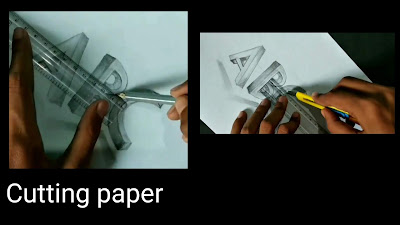
How to draw 3d words ABC, step by step tutorial, Art of Rohit

6.Sixth step:At last step friend's we will cut the paper into half parts by lefting words drawing on other side paper. It's help us so much for  to give 3d look for our words drawing.

I hope friend's you will understand to draw 'ABC' in 3D from Graphite pencils. For more information you can watch our YouTube videos.


Thank you for visiting us, follow us 


Sunday 16 December 2018

How to draw 'A'- 3D letters step by step tutorials

'A' 3D Letters Drawing- step by step tutorial by Art of Rohit

How to draw A , 3d letters drawing, step by step tutorial, learn to draw 3d letters, A 3d drawing, online drawing classes, easy drawing for kids, drawing for class 8

Hello friend's, once again welcome to our new drawing tutorial blog. Today we will learn to draw 'A' in 3d letters on paper. Here we will draw it on white paper with the help of graphite pencils and try to draw 'A' in 3d shapes. So before we going to start let's know the drawing tools we need for to draw.

                  Drawing tools we need

1.Graphite pencils-2b,4b,6b&8b
2.Charcol pencils
3.Paperstumps
4.Scale
5.Paper cutter
6.White papers

                       Important points

These are some important points we must remember when we are going to draw to the 'A' in 3d letter:

•Our first point is friend's to select a reference image of 'A' in 3d letter or otherwise you can imagine a image of 'A' in mind for to draw.
•Don't forget to draw the shadow texture for 'A'
 with the help of darker pencils.
•Cut the paper according to the 3d shape of letters from half parts of letters and left half part of paper with drawing.

So after knowing all this important points let's start our step by step tutorial of 'A'.

How to draw outline of A, step by step tutorial of A, learn to draw A, easy to draw A, easy Drawing, 3d drawing, on paper drawing

1.First step: In the first step friend's we will draw the outline of 3d letter 'A'. Here you can draw the outline of 'A' with the help of scale for perfect outline and for to draw use 0.5mm pencil for lighter outline.

How to draw the shadow, step by step tutorial for to draw shadow texture, learn to draw 3d A, easy drawing, 3d drawing,

2.Second step: In second step friend's we will draw the outline of shadow for 'A'. You can use scale for proper shadow outline and here I am using scale for to draw outline of shadow.
One thing must remember when you're going to draw the outline of shadow is try to match with the outline of 'A'.

How to shade A, learn to draw A, easy to draw A, drawing for kids, learn to draw'A'

3.Third step: In this step friend's we will shade the surface of 'A'. For shading the surface we will use 4b & 6b graphite pencils. Here we will draw the lighter shades with the help of 4b pencil according to the reference image and darker shades from 8b pencils.

How to draw shadow A, easy to draw shadow, learn to draw 3d letters, easy to draw letter

4.Fourh step: In this step friend's we will draw the shadow texture for 'A'. Here I am using charcoal pencil for to draw the shadow texture and blend it with the help of paperstumps.

How to draw A, easy to draw 3d letters, learn to draw 3d letters, step by step tutorial for to draw A

5.Fifth step: In this step friend's we will blend the surface of 'A' with the help of paperstumps for smooth texture. Try to draw the upper surface of 'A' with the help of paperstumps for very smooth shading.

Drawing A, drawing for kids, easy to draw A, drawing for kids, 3d letters drawing ,how to draw 3d letter

6.Sixth step: In this last step friend's we will cut the paper with the help of paper cutter. For cutting we will use scale for to draw straight line  according to the reference image and cut the paper with the help of paper cutter for 3d look. After cutting our drawing started to look in 3D shape.

I hope friend's you will understand and learn to draw 'A' in 3d. For more information you can watch our YouTube videos.


Thanks for visiting us, follow us now.


Friday 14 December 2018

How to draw skull - step by step tutorial by Art of Rohit

3D Skull Drawing - step by step tutorial by Art of Rohit


Skull drawing, 3d Drawing, how to draw 3d skull, learn to draw skull, online skull Drawing tutorial, easy to draw, step by step tutorial

Hello friend's, Once again welcome to our new drawing tutorial. Today we will learn to draw skull from graphite pencils on paper in 3d. So before we start let's know the drawing tools we need for to draw the 3d skull 

                   Drawing tools we need

1.Graphite pencils-2b,4b,6b&8b
2.Charcol pencils
3.Blending stumps
4.Paper cutter
5.White paper

                      Important points

These are some important points we must remember when we are going to draw the skull drawing:

•Draw the skull  with the imagination in your brain otherwise select a reference image of skull to draw.
•Try to use charcoal for the some parts of skulls like the eyes or nasal holes part.
•Draw shadow type texture on paper according to your refrence image.
•Here we were try to give 3d view so cutting paper into two parts by lefting the skull.

   So after knowing all this points let's start our                          step by step process.

Drawing outline of skull, step by step tutorial of skull, learn to draw skull from graphite pencils,

1.First step: In the first step friend's we will draw the outline of skull for to draw. Here I am using 0.5mm pencil for to draw outline. You can draw by the free hand or use grid method for proper outline.

How to draw skull, step by step tutorial, easy to draw skull, easy Drawing tutorial, pencil drawing tutorial of skull

2.Second step: In the second step friend's we will draw the lighter areas. Here shading the lighter areas according the reference image and for shading the lighter areas using 4b pencils.

How to draw skull, step by step tutorial of skull, learn to draw skull, easy Drawing tutorial of skull, online drawing, drawing classes

3.Third step:In this step friend's we will draw the eyes & nasal parts of skull. We will draw with the help of charcoal pencil or you can use 8b graphite pencils. By using 8b pencils we highlight the details of skulls according to the reference image.

How to draw skull, easy to draw skull, drawing for kids, skull bone drawings

4.Fourth step: In this step friend's we will the skull drawing for the smooth texture. For blending I am using paperstumps you can tissue papers also for smooth texture finishing.
Try to use darker grade pencils for highlighting the details for the skull drawing and it's give us realistic drawing look.

How to draw Drawing of skull , 3d Drawing of skull, step by step tutorial for to draw skull, learn to draw skull

5.Fifth step:Here in this step friend's we will cut the white paper into half parts by lefting skull from the drawing side. Also friend's don't forget to gave shadow texture for your skull drawing. You can cut according to the 5th step image of skull drawing.

So I hope friend's you will understand to draw the skull by this tutorial for more information you can watch our YouTube videos. 

   Thanks for visting us, follow us now


Monday 10 December 2018

How to draw IRONMAN Helmet with pencil on paper

IRONMAN HELMET Drawing- step by step tutorial by Art of Rohit

How to draw Inroman, Ironman helmet Drawing, step by step tutorial,learn to draw Ironman, pencil drawing of Ironman, easy Drawing for kids, Drawing for begginers, artist help Drawing, online drawing,
Hello friend's, Once again welcome to our new drawing tutorial. Today we will learn to draw IRONMAN Helmet by using graphite pencils on paper. So before start we need this drawing tools for to draw the Ironman Helmet.

                Drawing tools we need

1.Graphite pencils-2b,4b,6b & 8b
2.Charcol pencil
3.Kneaded eraser
4.Scale
5.Paper cutter

                     Important points

These are some important points we must remember when we start to draw Ironman helmet.
•Always try to use the darker grade pencils or charcoal pencils for to add details on outline of helmet according to the reference image.
•Add shadow texture at the lower surface of helmet on white paper because it's will give gave us drawing in 3d view and make more realistic.
•Cut the white paper with the help of paper cutter into two parts by remaining helmet drawing with the lowerside white paper according to the reference image. So it's will give us 3d view
So after knowing all these points let's start step by step drawing process.

How to draw Inroman, Ironman helmet Drawing, step by step tutorial,learn to draw Ironman, pencil drawing of Ironman, easy Drawing for kids, Drawing for begginers, artist help Drawing, online drawing,

1.First step: Our first step is to draw outline of Inroman helmet by using the grid method. Here I am using 0.5 mechanical pencil for to draw outline according to the reference image.

How to draw Inroman, Ironman helmet Drawing, step by step tutorial,learn to draw Ironman, pencil drawing of Ironman, easy Drawing for kids, Drawing for begginers, artist help Drawing, online drawing,

2.Second step: In the second step friend's we will draw the darker areas first of the outline of helmet according to the reference image.
For to draw darker areas outline by using 8b graphite pencil.

How to draw Inroman, Ironman helmet Drawing, step by step tutorial,learn to draw Ironman, pencil drawing of Ironman, easy Drawing for kids, Drawing for begginers, artist help Drawing, online drawing,

3.Third step: In this step friend's I am drawing the eyes and some lower part of Ironman helmet. For to draw eyes I am using dot-dot structure and after that shading the eyes area. For to put dots I am using 6b pencils and shading the eyes areas. Here I am also shading the lower areas with the help darker grade pencils according to the reference image.

How to draw Inroman, Ironman helmet Drawing, step by step tutorial,learn to draw Ironman, pencil drawing of Ironman, easy Drawing for kids, Drawing for begginers, artist help Drawing, online drawing,

4.Fourth step: Our fourth step is to shade the lighter dark areas according to the reference image by using 4b pencils. Adding also some darker details by using charcoal pencils.

How to draw Inroman, Ironman helmet Drawing, step by step tutorial,learn to draw Ironman, pencil drawing of Ironman, easy Drawing for kids, Drawing for begginers, artist help Drawing, online drawing,

5.Fifth step: In the fifth step friend's we will blending the shading areas for smooth texture on drawing and gave us realistic looks.
Using kneaded eraser for to some details according to the reference image.

How to draw Inroman, Ironman helmet Drawing, step by step tutorial,learn to draw Ironman, pencil drawing of Ironman, easy Drawing for kids, Drawing for begginers, artist help Drawing, online drawing,

6.Sixth step: In the sixth step friend's I am adding some details according to the reference image and cutted the white paper into half parts for 3d look. Also try to draw shadow texture for the Ironman helmet according to the reference image.

So I hope friend's you will understand to draw the Ironman Helmet in 3d look by this tutorial.For more information watch our step by step drawing video.


Thank you for visiting us, follow us now


Featured posts

Essential Drawing Tools and Materials for begginers - Top 10 list

    Basic drawing tools and accessories for begginers - by Art of Rohit  Hello friend's, today I will tell you and discuss about b...

Popular posts