Tuesday, 29 January 2019

Valentine's day card - Best 3 ways to make Greeting cards for valentine's day

Valentine's day card - step by step tutorial by Art of Rohit

Valentine's day card, how to make valentine's day cards, step by step tutorial, valentine's day cards 2019, easy greetings card for valentine day, valentine's day cards, valentine's day card for her/him, valentine's cards, easy cards for valentine's day, valentine's day cards design

Hey guy's once again welcome to our new tutorial. Today we will learn to make valentine's day greetings card for valentine day. Here we will learn to make three easy cards. You can use this cards on valentine's day to give your special ones for to make them happy and show his/her importance. Also share this valentine's card to your loving parents. So before we start step by step tutorial let's know things we need for to make.

                     Things we need

1.Chart papers of colour - black,white, sky blue
2.Stock card paper of dark blue colour
3.Scissors
4.Gum
5.Red colour papers

So after knowing all this thing's let's start step by step tutorial for to make valentine's day card

1.First Valentine's day card

Valentine's day cards, easy valentine's day cards, step by step tutorial, how to make valentine's day cards, card making for valentine's day, for begginers, valentine's day cards 2019,

This card is really so easy to make and it's take 10-5 minutes to make with the help of black chart paper and red colour plane paper. So let's start step by step tutorial:

Valentine's day cards, how to make valentine's day cards, valentine's day cards 2019, step by step tutorial, for begginers, forhim, valentine's day cards for girlfriends, easy valentine's day cards, valentine's day cards

First step: Cut black chart paper in recantuglar size (length 20cm, breadth 30cm)
Second step: We fold chart taking 5cm from left side and 10 cm from right  side. Now its started to look like as greeting cards.
Third Step: In this steps we will stick heart shape in our cards. We stick one big red shape heart at the place from we open's our card. So we will stick in middle of left side opening part.
Fourth step: We will stick two smaller shape heart at upper & lower opening part on right side.
Fifth Step: In this step we will stick black smaller heart shape on three red heart. Black colour heart should be smaller than red heart shape.
Sixth step : At last we add one strip of colour red from left side and one at lower part according to the reference image.

2. Second Valentine's day card

Valentine's day cards, valentine's day cards 2019, step by step tutorial for to make valentine's day cards, easy tutorial for to make cards, greetings card for valentine day, best cards for valentine's day, valentine's day card for her, valentine's  cards design

This second Valentine's day card is really little bit tough and time taking. It's take 30-45mins for to make . This card is one of my best card because of it's amazing look and cuteness. So here is step by step tutorial:

How to make valentine's day cards, valentine's day cards, for begginers, easy valentine's day cards, valentine's day cards 2019, easy greetings card for valentine day, best card for valentine day, valentine's cards for her

First step: First of all we take recantuglar shape white chart paper of length 15cm and breadth 30cm. Then we will fold it from middle and give card shape.
Second step: We will make strips of colour white and sky blue colour. From this strips we will make texture on card.
Third step: Then we will arrange it first we put white stripe at top according to the reference image. 
Fourth step: After completing that process we will put border of sky blue colour and stick big heart of sky blue colour at centre.
Fifth step: At last we put small white heart at centre part of card. Now it's completed

3.Third Valentine's day card

How to make valentine's day cards, step by step tutorial for to make card, easy tutorial for to make card,  best card design, valentine's day cards design

This is our last valentine's day cards friend's and one of easy card. It's take time 5-10mins
for to make. 
Easy valentine's crafts, valentine's day cards, how to make valentine's day cards, valentine's day cards design, easy card makeing

First step: We take one reactangular black chart paper of length 25cm and breadth 50cm. We fold it and make square cards.
Second step: Then we square stock card of blue colour having 23 cm height & breadth.
Third step: At last we make three different sized heart of black colour and stick according to the reference image. Also add two stripes of black colour according to the reference image.

I hope friend's you will like it don't forget to follow us. For more information you can watch our YouTube videos. Also watch our latest tutorial and blogs.


                  Thank you for visiting us


Thursday, 24 January 2019

Republic Day poster drawing tutorial with oil pastels - step by step tutorial

Republic Day poster drawing tutorial with oil pastel - step by step tutorial by Art of Rohit

Republic Day 2019, Republic day images 2019, Republic day drawing, easy republic day drawing, how to draw poster drawing for Republic Day for beginners, drawing for Republic Day, oil pastel drawing for Republic Day, Republic Day 2019, easy way to draw poster for Republic Day,online drawing drawing courses, school drawings, drawing for class 8 Republic Day, easy drawing for kids, step by step tutorial

Hello friend's, welcome to our new drawing tutorial. Today we will learn to draw poster for Republic day Here I am drawing 26th January and drawing flag tricolours. So before we start let's know the drawing tools we need for to draw poster for Republic day.

Drawing tools we need

1.Oil pastels
2.Mechanical pencils
3.Tissue papers
4.White paper - A4 size 

                         Important points

These are some important points which we must take care when we are going to draw poster for Republic day with oil pastels:

•Draw outline with the help of mechanical pencil or with light grade pencils so it's not  visible when we applied colours.
•Don't apply lots of layer on paper with oil pastels so it's became hard to blend.
•Blending will be done with the help of tissue papers.

So after knowing all this important points let's start our step by step tutorial for to draw poster drawing for republic day.

Republic day drawing, Republic Day images ,2019 republic day ,how to draw poster drawing for Republic Day ,School drawing ,Soft Board drawing, easy drawing for kids, step by step tutorial ,oil pastel drawing for Republic Day

1.First step: First of all friend's we will draw outline for to draw poster. Here we will draw '26th January' on paper. For to draw use 0.5mm mechanical pencil and Hb graphite pencil. 

Republic day drawing, Republic Day images ,2019 republic day ,how to draw poster drawing for Republic Day ,School drawing ,Soft Board drawing, easy drawing for kids, step by step tutorial ,oil pastel drawing for Republic Day

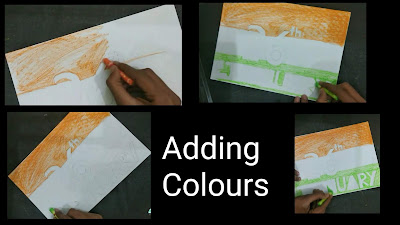
2.Second step: In second step friend's we will add colours by using oil pastels. So here first we will draw tricolours according to our indian flag and left the area of where we draw 26th January.

Republic day drawing, Republic Day images ,2019 republic day ,how to draw poster drawing for Republic Day ,School drawing ,Soft Board drawing, easy drawing for kids, step by step tutorial ,oil pastel drawing for Republic Day

3. Third step: In third step friend's we will blend the colours by using tissue papers. Friend's tissue paper is one of the best way to blend the colours of oil pastels. Do it slowly so it will done in right way and give us smooth drawing.

Step by step tutorial,Republic day drawing, Republic Day images ,2019 republic day ,how to draw poster drawing for Republic Day ,School drawing ,Soft Board drawing, easy drawing for kids, step by step tutorial ,oil pastel drawing for Republic Day

4.Fourth step: At last friend's we will complete drawing. So we will fill '26th' with blue colours and blend it. At corner use drak blue colours.
Outline 'January' with dark green colours and now our drawing is completes

So I hope friend's you will like it, for more information you can watch our YouTube videos. Also watch our latest Drawing tutorial and drawing tools.


Thank you for visiting us,follow us now


Sunday, 20 January 2019

Essential Drawing Tools and Materials for begginers - Top 10 list

    Basic drawing tools and accessories for begginers - by Art of Rohit

Drawing tools for beginners, essential drawing tools for beginners, artist drawing tools and accessories, pencil drawing tools, sketch artist tools, best tools for artist, graphite pencils

 Hello friend's, today I will tell you and discuss about basic drawing tools and accessories that we need for realistic pencil drawing. Here I will discuss one by one each drawing tools and accessories that we need. So let's start...

1. Sketchbook & Drawing paper

Drawing paper and drawing book, sketch artist drawing book, drawing tools for begginers, essential drawing tools for begginers, best drawing tools for artist, drawing sheets for artist

Sketchbook and drawing paper is the first need of every sketch artist because on drawing paper artist draw according to their needs. So it's became very important for any artist for to select good quality paper and these are some points which  must be in drawing paper sheets: • Quality and material of paper it is made • the surface quality • Acid free • 30 & 60 lbs for light sketching and 70 & 100 lbs for charcoal drawing paper.

Click here to BUY NOW at best price.

2. Graphite pencils

Essential drawing tools for begginers, drawing tools and accessories for sketch artist, best drawing tools, sketch artist tools, essential drawing tools for begginers, drawing tools

Graphite pencils is our second most important drawing tools for sketching because with the help of graphite pencils we able to do shading on drawing paper and draw different-different textures on drawings. Graphite drawing pencils comes in different grade like Hb,2b,4b,6b,8b,10b is soft pencils & 2h,3h,4h,6h,8h is hard pencils. Once you understand the types of lines from you will easily able to draw realistic darwings.

Click here to BUY NOW at best price.

3. Charcol pencils

Charcoal pencils, drawing tools, drawing tools for begginers, best sketch artist charcoal pencils, drawing supplies, cheap drawing tools, essential drawing tools for begginers, sketching tools

Charcoal pencils is our third most important drawing tools for sketching because it's help us to add dark shades in our sketches and make it more realistic. Charcoal pencils have compressed charcoal inside so it's became difficult for us to erase. Charcoal pencils came in three grades Soft,hard and medium.

Click here to BUY NOW at best price

4. Paperstumps

Essential drawing tools for begginers, blending stumps, paperstumps, essential drawing tools for begginers artist, best drawing tools, sketching tools, blending tools, paper blending, drawing tools

Paperstumps is our fourth most important darwing tools for sketching because we use it for to smudge and blend charcoal, graphite pencils. By using paperstumps we give light and dark values and it's spread the graphite and fill the grooves for smooth finish drawing.
In realistic pencil drawing we use paperstumps for to give smooth texture in drawing.

Click here to BUY NOW at best price

5. Kneaded eraser

Drawing tools for begginers, kneaded eraser, drawing tools, sketch artist drawing tools , top 10 drawing tools,

Kneaded eraser is our fifth most important drawing tools for sketching because we use kneaded eraser for to highlight details in pencil drawing. This eraser like clay it's don't have fixed shape and it's main work is picking up graphite and charcoal particles from sketch. This eraser is only able to remove light charcoal and graphite pencils. It's mainly used to remove thin details.

Click here to BUY NOW at best price

6. Mechanical pencils

Drawing tools for begginers, best drawing tools, sketch artist drawing tools, best cheap drawing tools, drawing accessories, drawing supplies, top 10 drawing tools

Mechanical pencils comes in sixth most important drawing tools for sketching because we mainly use it for to draw outlines and shadings. This pencils came also in so many grades and becoming so popular in mordern artist for it's features.

Click here to BUY NOW at best price

7. Charcol powder

Drawing tools for begginers, charcoal Powder, charcol powder for artist, best sketching tools, drawing supplies, best cheap drawing tools, top 10 drawing tools

Charcoal Powder is our seventh most important drawing tools for sketching & realistic drawings. We mainly use charcoal Powder because it is rich and dark. Some advantages of charcoal powder is it's don't give shiny finish and capable of producing dark values. It's applied by brush on the surface. It is great for toning areas on the drawing surface during drawing process.

Click here to buy now at best price

8. Mono eraser

Mono eraser is our eighth most important drawing tools for sketching & realistic drawing. We mainly use it for to add and highlight details in realistic pencil drawing. It's round in eraser shape and very thin and add very fine detailed in our drawings.

  Click here to BUY NOW at best price

9. Scale

Scale is our ninth most important drawing tools for sketching & realistic drawing.  We use scale in our for to grid on white for to draw proper outline or also used in perspectives drawings.

10. Sharpner

Sharpner is 10th important drawing tools for sketching . We use sharpner for to sharp graphite pencils because it's important for pencils for proper shape and stability.

  Click here to BUY NOW at best price

So friend's this is the  Top 10 drawing tools for begginers and this are some my drawing tutorials which I have drawn from this drawing tools. I hope you will like it, don't forget to follow us.

Thank you for visiting us

Wednesday, 16 January 2019

How to draw 3D Block letters with graphite pencils - step by step tutorial

Drawing '3D' word in 3d block letters - step by step by Art of Rohit


How to draw 3D block letter, step-by-step to draw easy drawing for 3D pencil drawing,3D pencil drawing with the help of Graphite pencils,how to draw 3D, 3D block letters drawing, step by step tutorial for to draw block letters, 3D block letters drawing for kids, drawing for beginners, online drawing, online drawing tutorial

Hey guy's, once again welcome to our new interesting 3D drawing tutorial blog. In this tutorial we will learn to draw words in 3D BLOCK letters. Here I decided to take word 3D for to draw in block letters. So let's start but first we need to know the drawing tools that we need for to draw.

Drawing tools we need

1.Graphite pencils - 4b & 6b
2.Mechanical pencils
3.Paperstumps
4.Scale
5.Papercutter

                        Important points

These are some important points that we must remember when we are going to draw 3D block letters.

•Always try to draw with the help of two point perspectives or one point perspectives because from this method we get right 3D drawing with right angle.
•Shading will be done according to the block letters angle and size.
•Always try to draw shadow texture for block letters and cut the paper into half parts by lefting drawing remove upper part.
After knowing all this important points let's start our step by step tutorial for to 3D block letters.

How to draw block letters ,step by step tutorial for to draw 3D block letters, pencils drawing, 3D drawing of pencils, easy drawing for kids, graphite pencil drawing of block letters, 3D drawing kids drawing, drawing for beginners

1.First step: In first step friend's we will draw the outline of 3D with the help of mechanical pencil. Use 0.5mm grade pencils for lighter outline. For to draw proper outline use grid method otherwise draw with freehand.

how to draw 3D block letters,step by step by step tutorial,easy drawing for kids, 3D drawing for kid 3D block letters, step by step tutorial graphite pencil, drawing of 3D drawing ,online drawing videos, online drawing courses ,online drawings

2.Second step: In this step we will draw line from one to each corner point of 3D outline. Here for to draw lines using one point perspectives with the help of scale and use mechanical pencil for to draw scale. Now you can see in above image that our '3D' word started to look in 3D block letters.

Drawing for kids, step by step tutorial how to draw 3D block letters graphite drawing 3D letters, online drawing blog, step by step tutorial for beginners

3.Third step: In this step we will complete the outline of 3D word. One thing you must take care that you need to draw a line of fixed centimetres. As you can see here I take 3cm for to draw line and each lines must be of same size. Again match outline on backward part for to complete for 3D look.

How to draw 3D block letters, step by step tutorial how to draw 3D block letters, easy drawing for kids, tutorials for drawing for beginners, 3D block letters

4.Fourth step: Now friend's we will do shading for our 3D word drawing. For Shading first I shade internal layer of 3D word using 6b graphite pencils and for shading upper layer using 2b pencils for lighter shades. Dark the some corner areas according to the above image.

How to draw 3D block letters, step by step tutorial, drawing for kids, how to draw 3D block letters, step by step tutorial, drawing for beginners, graphite pencils drawing of blocks letters, how to draw 3D drawing with pencil

5.Fifth step: In this last step friend's we will blend the shading areas with the help of paperstumps. After blending we will draw straight in middle of 3d drawing and cut it with the help of paper cutter. Remove upper part by lefting drawing with the lower paper part.

I hope friend's you will enjoy it and understand my process for to draw 3D block letters on paper with graphite pencils. So more information you can watch our YouTube videos and watch our new interesting tutorial.


Thank you for visiting us, follow us now


Saturday, 12 January 2019

How to make Kite with papers - step by step method tutorial

Kite making - step by step method by Art of Rohit

How to make kite, step by step tutorial for to make kite, easy tutorial for to make kite, easy steps for make kite, Makar Sankranti kite, easy tutorial for to make kite,indian kite tutorial, Art and crafts for kite,

Hey guy's whasupp, today I decide to give you tutorial about step by step process for to make kite. Mainly on Makar Sankranti people fly kite in sky and celebrate it nicely. So for you here is method to make kite at home witj the help of some tools and stationiers. First let's know the stationeries we need for to make.

                   Stationeries we need 

Kite making, stationery tools from kite making, easy way of kite making, how to make kite, step by step method for kite, stationary tools for kite making, easy steps for kite making, how to make kite making, kite making for Makar Sankranti

1.Thin chart paper
2.Thin wood stick
3.Papercutter
4.Gum
5.Scale
6.Small rectangular paper

                        Important points

These are some important points we must take care when we are going to make kite with the help of papers and thin wooden sticks:

•Friend's always try to take thin chart papers as much as you can take for to make kite because it's make easy for us to fly in sky.
•Take 2 thin wooden sticks with different lengths. Here we take one wooden stick of 35cm for bisecting from both corners of square shape size kite and second of 40cm for connecting to two corner part of kite.
•Use scale for proper size of wooden sticks and chart papers so you can get accurate shape and size of kite.
•At last don't forget to make tale for your kite because it's balance kite in the sky.

So after knowing all this important points let's start our step by step method for to make kite at home in just four steps.
How to make kite, step by step process for kite, how to make kite easy tutorial, step by step process for kite making, drawing kite tutorial for kids,  easy method for kite making

1.First step: In this step friend's we first cut thin chart paper in square shape. Here we put wooden stick of 35cm on both chart paper corner for bisecting and draw straight line from upper corner to downwards. After when we draw the lines we will get square shape and cut it with the help of paper cutter.

How to make kite, step by step tutorial for to make kite, how to make kite on makar Sankranti, step by step guide for to make kite, easy tutorial for to kite

2.Second step: In this step friend's we will stick thin wooden sticks on square shape chart paper. First we stick 35cm wooden stick on chart paper from one corner to opposite corner. Then we stick both recantuglar paper on another corner according to the above image. You can use gum for to stick rectangular paper with chart paper left it for some minutes.

How to make kite, step by step method to draw for to make kite,easy tutorial for to make kite, step by step method for to make kite, how to make kite on Makar Sankranti festival, Makar Sankranti kite,

3.Third step: In this step friend's we will stick 40cm wooden stick with paper but here we don't stick with gum. For stick we use recantuglar paper. We only hold thin wooden stick on corner of rectangular paper and stick with recantuglar paper by applying gum on paper. On other side we do this same paper.

How to make kite, step by step tutorial for to make kite, easy tutorial for to make kite, easy tutorial for to make kite, easy steps for kite making, indian festival kite, how to make kite on makar Sankranti, paper kite, easy tutorial for to make kite

4.Fourth step; In this last step friend's we will do only one thing is we make tail for our kite because of tail our kite balance in sky. So for to make tale cut triangular shape according to the size of kite and stick it at lower corner of kite according to the above image.

So I hope friend's you will like our method for to make kite and understand it properly. By following these steps you can different-different kitesfor makar Sankranti. For more interesting blogs you can visit our site and find more creative tutorial.

   Thank you for visiting us, follow us now


Thursday, 10 January 2019

How to draw BANANA with pencil on paper - step by step tutorial

Banana drawing - step by step tutorial by Art of Rohit


How to draw banana, pencils drawing, drawing of banana, easy drawing for kids of bananas, drawing for class 8, fruits and vegetable drawing, realistic drawing easy and tricky drawing

Hello guy's once again welcome to our new drawing tutorial blog. This tutorial is part  of fruits drawing and we learn to draw banana by using graphite pencils on white paper. So without wasting any time let's get started.
Before we start let's know first the drawing tools we need for to draw BANANA.

                 Drawing tools we need

1.Graphite pencils - 2b,4b,6b & 10b
2.Paperstumps
3.Kneaded eraser
4.White pencils

                     Important points

These are some important points which we must take care when we are going to draw banana with graphite pencils

•First thing you must take care that always draw outline with the help of light grade pencils.
•Always first start shading for lighter shades part so you can darker shades according to the reference image.
•Draw shadow texture and use kneaded eraser for to add high details in banana drawing for to make it realistic.
So after knowing all this important points let's start our step by step tutorial for to draw banana.
How to draw banana, easy drawing, banana drawing for begginers, easy realistic drawing, fruits and vegetables drawing

1.First step: In first steps we will draw outline of banana. For to draw outline you can use 0.5mm or Hb pencils. You can use grid method for to draw proper outline or draw it with freehand also as per your requirement.

How to draw banana, easy step by step tutorial, learn to draw banana, fruits and vegetables drawing, begginers drawing of bananas

2.Second step: In this step friend's we will shade the lighter shades part of banana. For Shading lighter shades use 4b pencils. Here I am shading half part of bananas according to the reference image.

How to draw banana fruits, easy tutorial for to draw banana, easy kids drawing, step by step tutorial for to draw banana

3.Third step: In this step guy's  we will shade some darker shades part of banana. For shading darker shades use 6b pencils. Here you can see I am shading some lower corner parts according to reference image.

How to draw banana,easy drawing of bananas, easy to learn to draw, class 8 drawing, easy banana drawing

4.Fourth step: In this step friend's we will do blending for smooth texture. For blending I am using paperstumps and shading from paperstumps on banana according to our reference image. Also use 6b for add some details on banana.

How to draw shadow texture for banana fruits, easy and simple banana drawing, how to draw banana fruits, simple fruits drawing,

5.Fifth step: In this last step guy's we draw shadow texture for our drawing. For to draw shadow first shade with 4b on shadow area and then blend it with the help of paperstumps. Also use kneaded eraser for to add some white details according to the reference image.

I hope friend's you will like it don't forget to watch our tutorial. For more information you can watch our YouTube videos

         Thanks for watching, follow us now


Monday, 7 January 2019

How to draw House for kids - step by step tutorial

Drawing house for kids on paper with graphite pencils by Art of Rohit

House drawing for kids, how to draw house, step by step tutorial of house drawing, drawing tutorial for kids, easy steps for to draw house, easy steps housedrawing

Hello guys, once again welcome to our new drawing tutorial blog. Today this tutorial is for children's who start to learn about drawing & sketching and today we learn to draw house by using graphite pencils on paper in just few easy steps. So before we starts let's know first the drawing tools we need for to draw house.

Drawing tools we need

1.Graphite pencils - 2b,4b,6b, & 8b 
2.Scale 
3.Paperstumps
4.White paper

                         Important points

These are some important points we must take care when we are going to draw the drawing of house by using pencils:

•Use scale for to draw proper outline of house and use light shade pencils for to draw outline.
•Draw gate, windows and chimney for the house by using pencils.
•At last try to use paperstumps or tissue papers for smooth texture of walls of house. It's help to give realistic look.

After knowing all this important points let's start our step by step tutorial for to draw house.

House drawing for kids, how to draw house, step by step tutorial of house drawing, drawing tutorial for kids, easy steps for to draw house, easy steps housedrawing

1.First step: In first steps friend we will draw outline for the house drawing. For to draw outline use 2b pencils. First we draw square shape and then draw recantuglar shape as you see in above image. Now for to draw roof of house draw a line of 3-4 cm from middle of upper square drawing to towards and draw line from square shape corner to upper point of line of middle of square shape and after drawing erase it. From above you will understand the process easily for to draw roof.

House drawing for kids, how to draw house, step by step tutorial of house drawing, drawing tutorial for kids, easy steps for to draw house, easy steps housedrawing

2.Second step: In second step friend's we will draw the window and gate for house because it's one of the essential parts of any house.
We draw gate in square shape and for to draw gate draw rectangular shape and draw a line in middle. For to draw window first draw square and then draw small square shapes according to the above image and erase extra lines.

House drawing for kids, how to draw house, step by step tutorial of house drawing, drawing tutorial for kids, easy steps for to draw house, easy steps housedrawing

3.Third step: Now in this steps we will learn to draw outline of wooden walls for house. As you see in above image I am drawn straight lines first and drawn small line by lefting gap between two lines. After completing this process draw small line in gaps and take care never match any lines and maintain some distance from above small line. Also draw vertical lines on gate side walls and horizontal lines on window side wall.

House drawing for kids, how to draw house, step by step tutorial of house drawing, drawing tutorial for kids, easy steps for to draw house, easy steps housedrawing

4.Fourth step: In fourth step friend's we complete the outline of wooden walls. Here we draw small horizontal lines on gate side walls by making gape. Also by following the same process we draw outline of window sides wall but here we draw small vertical lines by making gape. Also one thing take care that never match the lines in this process.

House drawing for kids, how to draw house, step by step tutorial of house drawing, drawing tutorial for kids, easy steps for to draw house, easy steps housedrawing

5.Fifth step: In this step we will do shading for house. For Shading house use 4b and 6b. First we shade the house roof and shading first with 4b pencil and adding darker shades texture at corner by using 6b graphite pencils. Also by following these shading method we shade the walls of house.

House drawing for kids, how to draw house, step by step tutorial of house drawing, drawing tutorial for kids, easy steps for to draw house, easy steps housedrawing

6.Sixth step: At last step friend's we will blending house for smooth texture. For blending you can use paperstumps or tissue papers. Also draw the darker shades of gate and window by using 8b graphite pencils and 
shade the gate and windows. 

Now our house drawing is complete in just few steps. I hope you will like it and enjoy it also don't forget to follow us.

                 Thank you for visiting us


Thursday, 3 January 2019

How to draw Steel cup - step by step tutorial - realistic cup drawing

Steel cup drawing - step by step tutorial by Art of Rohit

Drawing realistic steel cup drawing, how to draw cup, step by step tutorial of Cup , easy drawing for begginers, drawings for kids, graphite pencils drawing

Hello friend's, welcome to our new drawing tutorial blog. In this tutorial we will learn to draw realistic drawing of steel cup with the of only pencils. So before we start step by step tutorial let's know the drawing tools we need for to draw steel cup drawing.

Drawing tools we need

1.Graphite pencils - 2b,4b,6b,8b &10b
2.Charcol pencils
3.Paperstumps 
4.Kneaded eraser
5.White papers

                         Important points

These are some important points which we must take care when we are going to draw realistic steel cup drawing:

•Draw each and every details of steel cup because then it's start to look in realistic drawing.
•Use kneaded eraser for to add some details in drawing according to the reference image.
•Don't forget to draw shadow texture for our drawing because it's help a lot in giving realistic look to our drawing.

After knowing all this important points let's start our step by step tutorial for to draw realistic steel cup drawing.

Drawing outline of cup, steel cup drawing of cup, grid method outline of cup,

1.First step: In first step friend's we will draw outline of steel cup according to the reference image. For to draw outlines use 0.5mm pencils for lighter shades. You can use grid method for to draw proper outline otherwise draw it with freehand. Here also I am drawing with freehand.

How to shade cup,Drawing realistic steel cup drawing, how to draw cup, step by step tutorial of Cup , easy drawing for begginers, drawings for kids, graphite pencils drawing

2.Second step: In second step we will do shading for our steel cup drawing. First we will shade it with 2b and 4b pencils for adding light shade.Then according to the reference image we add darker shades. For to draw darker shades use 6b and 8b pencils. Here you can see in shading cup image drawing some specific darker shades shapes according to the reference image

Blending cup of steel of cup, how to draw cup,Drawing realistic steel cup drawing, how to draw cup, step by step tutorial of Cup , easy drawing for begginers, drawings for kids, graphite pencils drawing

3.Third step: In this step friend's we will blend the drawing for smooth texture of steel cup drawing according to reference image. For blending here I am using paperstumps but you can use tissue papers also.

Shading darker shades, easy tutorial of cup drawing,Drawing realistic steel cup drawing, how to draw cup, step by step tutorial of Cup , easy drawing for begginers, drawings for kids, graphite pencils drawing

4.Fourth step: In this steps friend's we will draw the inner walls of steel cup. For to shade  inner walls use 10b pencils. At corner parts of inner walls use charcoal pencils for realistic look. Also add some details in handle of cup and in some parts according to the reference image by using charcoal pencil.

Drawing shadow for cup, how to draw cup,Drawing realistic steel cup drawing, how to draw cup, step by step tutorial of Cup , easy drawing for begginers, drawings for kids, graphite pencils drawing

5.Fifth step: In last step friend's we will draw shadow texture for steel cup drawing. For shadow texture first we shade with 2b  pencils
and then we will blend it with the help of paperstumps for smooth shadow texture. We also use kneaded eraser for add some details at some parts according to the reference image

So I hope friend's you will like it for more information you can watch our YouTube videos. Also watch our more drawing tutorials on our blog.


Thank you for visiting us, follow us now


Featured posts

Essential Drawing Tools and Materials for begginers - Top 10 list

    Basic drawing tools and accessories for begginers - by Art of Rohit  Hello friend's, today I will tell you and discuss about b...

Popular posts