Thursday, 5 September 2019

Linear Perspective and Different types of perspective drawing

Different types of perspective drawing, Linear perspective, types of perspective drawing, kinds of perspective drawing, all types of perspective drawing, Linear perspective drawing types, perspective drawing tutorial, step by step, perspective drawing online tutorial, online drawing classes

Today we get to know about Linear perspective and Different types of perspective drawing. So first let's know what is Linear Perspective?
Linear perspective is a drawing techniques of creating illusion of depth on a flat surface. In linear perspective drawing there are the three main components:

1. Orthogonal - It refers to perspective lines drawn diagonally along lines that meet at a Vanishing point.
2. Vanishing point - It refers to a point where all the lines seem to meet and this point become end point for lines.
3. Horizon line - It refers to a line which is always at the eye level. Basically we imagine Horizon line when we standing along the coast and looking at the ocean, where we notice that sea water and sky meet at our eye level.

Linear perspective drawing uses in creating three-dimensional drawing on a flat surface. Basically this techniques uses in creating 3d drawing,  Interior drawing, Artitectural drawing, etc., So let's know different types of perspective drawing.

1. One-point perspective

Types of perspective drawing, one-point perspective drawing tutorial, step by step perspective drawing tutorial, different kinds of perspective drawing, linear perspective drawing tutorial, linear perspective

One-point perspective is a first type of linear perspective. Here there is only one vanishing point and all the lines of object seems to meet vanish point. It's add more depth to the image. We uses one-point perspective in drawing of railway tracks, roads, and interior drawing.

2. Two-point perspective

Two-point perspective drawing tutorial, different kinds of perspective drawing, perspective drawing tutorial, Linear perspective drawing tutorial, step by step tutorial, two-point perspective drawing tutorial

Two-point perspective is the second type of linear perspective. In this method there were two vanishing point where the objects line rises from convergence point and end at vanishing point. We basically observe this method in drawing  house where all the lines of houses meet at vanishing point from convergence point. Also this technique uses so much in interior drawings.

3. Three-point perspective

Different types of perspective drawing, types of perspective drawing, three point perspective drawing tutorial, step by step perspective drawing tutorial, linear perspective

Three-point perspective is the third type of linear perspective where there we use three vanishing points and third vanishing point is always placed under or above the horizon line. In this type technique we must take that when we draw objects we need to see that object is above or under the horizon line we take vanishing point at above or object is under the horizon line we take vanishing point at below. We basically use this technique in drawing object like 3d buildings, boxes etc., .

4. Four-point perspective 

Linear perspective drawing tutorial, four-point perspective drawing tutorial, step by step tutorial, kinds of perspective drawing,linear perspective drawing tutorial

Four-point perspective is the fourth type of perspective where there were four vanishing point equally spaced. Two vanishing point at horizon line and another third at above and fourth at under the horizon line. It will form a 360° view. It gives and describes view of Ant's eye view or Bird's eye view at the same time.

5. Five-point perspective

Different types of perspective drawing, Linear perspective, types of perspective drawing, kinds of perspective drawing, all types of perspective drawing, Linear perspective drawing types, perspective drawing tutorial, step by step, perspective drawing online tutorial, online drawing classes

Five-point perspective is the fifth type of perspective drawing where we use five points and all four vanishing point is same as we take for four-point perspective and fifth vanishing point is at centre. All lines of the object start from the corner and ends at fifth vanishing point. It captures everything from North to South and from Nadir to Zenith. It gives us wide-angled or a fish-eye lens effect to the drawing.

I hope you will get to know about Linear perspective and Different types of perspective drawing. For more amazing drawing tutorials you can follow us now.

Monday, 22 July 2019

How to draw cast shadow in perspective drawing - Shadow Perspective Drawing

Cast shadow drawing method, cast shadow drawing tutorial, what is cast shadow drawing, rectangle box cast shadow drawing, easy drawing tutorial for cast Shadow, Begginers tutorial , online drawing classes, online calsses

Hey everyone, today we will learn the method to draw cast shadow in perspective drawing. Basically when we draw any object with the help of perspective method there is need to draw cast shadow for object in right shape. Cast Shadow forms when the light not passes from object and form a shadow behind the object in opposite side of light source. So let's each process step by step how cast shadow drawn in rectangular box.

First step : Draw Rectangular Box with the help of Two point perspectives

Rectangular cast shadow drawing, easy shadow drawing, Cast shadow drawing method, cast shadow drawing tutorial, what is cast shadow drawing, rectangle box cast shadow drawing,  online drawing classes, online calsses

In first step friend's we draw any object. So here I am choosen to draw rectangular box so you can learn cast shadow drawing method easily. First you need to draw one horizon line in the middle. After that take two vanishing point at each different side. Draw two lines first from both side by maintaining some gap and intersect it. Draw straight line between the two intersection point. Then draw two straight vertical lines at both side and also draw third line from both points according to the above image.

Second step : Draw Lines from Light Source to the top three corner

Cast shadow drawing method, cast shadow drawing tutorial, what is cast shadow drawing, rectangle box cast shadow drawing, easy drawing tutorial for cast Shadow, Begginers tutorial , online drawing classes, online calsses

Here in second step we will draw straight vertical line from horizon line. This line is one of the most important part of cast Shadow drawing method because how much this line is taller it will make shorter shadow or how much shorter it will make shadow taller and bigger. When light source line drawn we draw lines from upper light source to the top corners of the object. Here you can see in above image how I drawn lines to the top three corners of rectangular box.

Third Step : Draw Lines from Light Source to lower three Corners of Box

Cast shadow drawing method, cast shadow drawing tutorial, what is cast shadow drawing, rectangle box cast shadow drawing, easy drawing tutorial for cast Shadow, Begginers tutorial , online drawing classes, online calsses

In third step friend's we will draw lines from the lower point of straight vertical line of light source to the lower three corners of box. Now here we will see lines from upper light source and lines from lower light source intersecting. Then we draw lines between the intersecting point. You will able to get outline of shadow of cast shadow for the rectangular box.

Four step : Draw the areas of Cast Shadow


Cast shadow drawing tutorial step by step, Cast shadow drawing method, cast shadow drawing tutorial, what is cast shadow drawing, rectangle box cast shadow drawing, easy drawing tutorial for cast Shadow, Begginers tutorial , online drawing classes, online calsses


At last step friend's we will do shading of cast shadow. Here you need to take care that colour the cast shadow with different shades. Just like here I have shaded darker on that portion where there is no chance of light source and do shading lighter to those portion where some light source available.

So I hope friend's you enjoyed and able to understand each and every process easily. For to learn more in drawing and art subject Follow and if you like it Share our work.

Monday, 8 July 2019

How to draw house with two point perspectives - House Drawing

How to draw house with two point perspectives, house drawing, two point perspectives drawing, 3d house drawing, House drawing for begginers, perspectives house drawing, house perspectives drawing, easy house drawing tutorial, step by step tutorial of house

Hey guy's, welcome back to our another drawing tutorial. This tutorial is another house drawing tutorial with the help of two point perspectives. Basically for to draw house two point perspectives is best method to draw proper house. So let's start drawing tutorial of house with two point perspectives.

                   Drawing tools we need

1.Graphite pencils
2.Scale
3.White Paper
4.Eraser

Important points

This are some important points which you must take care when you are going to draw house with the help of two point perspectives.

•Before you gone to start drawing first understand what is method of two point perspectives drawing.
•For to draw house by using two point perspectives take wide drawing paper sheets.
•Always take two point in straight and horizontal pattern.

After knowing all this important points let's start our step by step tutorial.

How to draw house with two point perspectives, house drawing, two point perspectives drawing, 3d house drawing, House drawing for begginers, perspectives house drawing, house perspectives drawing, easy house drawing tutorial, step by step tutorial of house

1. First step: In first step we need to take two point first at two different side in horizontal pattern. Then we draw two lines from both point and lines of two points got matched at vanishing point. After that we draw straight line vertically and it will started to look in 3d rectangular box. We need to draw staright line between two lines of one side according to the length of house . Draw lines from both two points to centre lines. Then draw straight lines from second  point to that point. At last draw parallel lines at other last both point side.

How to draw house with two point perspectives, house drawing, two point perspectives drawing, 3d house drawing, House drawing for begginers, perspectives house drawing, house perspectives drawing, easy house drawing tutorial, step by step tutorial of house

2. Second point: In second step friend's we will draw lines from second point towards the roof side. After that we will draw parallel lines between the two lines of roof. Now our house drawing having proper house roof pattern by following this step.

How to draw house with two point perspectives, house drawing, two point perspectives drawing, 3d house drawing, House drawing for begginers, perspectives house drawing, house perspectives drawing, easy house drawing tutorial, step by step tutorial of house

3. Third step: In this step friend's we will draw front gate of the house. So for to draw gate we need to draw line from one point at the certain height of the house gate as per height requirement. Then we draw two lines straight. In this above image I have drawn  double lines for to make bigger gate.

How to draw house with two point perspectives, house drawing, two point perspectives drawing, 3d house drawing, House drawing for begginers, perspectives house drawing, house perspectives drawing, easy house drawing tutorial, step by step tutorial of house

4. Fourth step: In this step we will draw window for the house. So we draw two lines from 2 point then draw two lines vertically by maintaing some gap. After that draw some lines from 2 point and also draw some staright lines by maintaining gap. When lines are drawn erase extra lines.

How to draw house with two point perspectives, house drawing, two point perspectives drawing, 3d house drawing, House drawing for begginers, perspectives house drawing, house perspectives drawing, easy house drawing tutorial, step by step tutorial of house

5. Fifth step: At last step friend's the main work is to erase extra lines of the drawing. You need to identify the lines which are not part of drawing and erase all the extra lines properly.

So I hope friends you will enjoyed the tutorial. Also for more 3d drawing tutorial & diy  follow us now.

Thank you for visiting us


Sunday, 30 June 2019

Four Blending Tools for Sketching - Drawing Blending Tools

Blending tools for sketching, tools for blending in drawing, why blending stumps important, types of blending tools, blending tools and materials, beginners drawing guide

Hello friend's, blending  process in sketching is one of major process and it is a process smudge and blend of graphite and charcoal pencils. So for blending for different levels we require different-different tools. Mainly blending tools were used to end black dots in drawing and it will help end graphite dots by mixing with paper surface. Here we will discuss each tools property and where they were used.
Paperstumps, blending tools, why blending tools is important, tools for blending, beginners guide,Blending tools for sketching, tools for blending in drawing, why blending stumps important, types of blending tools, blending tools and materials, beginners drawing guide

1. Blending stumps and Tortillions

Blending stumps and Tortillions are both two different products. Tortillions are blending tools which is mainly used for blending harder surface where high pressure is required because of having pointer tips. Blending stumps are tools which are mainly used for blending high pencils grades and charcoal pencils. It used for to get dark values smooth texture and also through smudges process we can draw many textures like shades of tress and then draw stems by using dark pencil.

Brushes tools, Blending tools for sketching, tools for blending in drawing, why blending stumps important, types of blending tools, blending tools and materials, beginners drawing guide

2. Brushes

Using watercolor brushes is for blending in sketching is also one of the best option. Mainly brushes is use for blending charcoal shading and for larger surface. Nature Hog Bristle type is brush is the best type of brushes for blending. Also we use it for blending higher grade pencils for dark values.
Tissue papers, begginers drawing tips, tissue papers best blending tools ,Blending tools for sketching, tools for blending in drawing, why blending stumps important, types of blending tools, blending tools and materials, beginners drawing guide
Photo - pixabay.com

3. Tissue papers

Tissue papers basically is one of the best option for blending smooth textures and it mainly used in giving smooth texture to the skin. You can use tissue for blending of 4b, 2b graphite shades for to give smooth texture and it will give you very smooth textures in your sketching.

Cottonbuds, cotton buds blending tools, Blending tools for sketching, tools for blending in drawing, why blending stumps important, types of blending tools, blending tools and materials, beginners drawing guide
Photo - Pixabay.com

4. Cottonbuds

Cottonbuds is also of the best tools for an artists. Mainly cottonbuds used in blending the smaller surfaces and it will give very smooth texture. You can do shading or smudge with cottonbuds for giving smooth textures.

So I hope friend's you will understand each basic tools for blending in sketching. For information about drawing tips and 3d drawing tutorial follow us now.

                   Thank you for visiting us

Tuesday, 25 June 2019

5 Important points for to improve your drawing skill

Important points for to improve your drawing skill, how to improve drawing skills, ways to improve you drawing skills, 5 best ways to improve drawing skills,

Hey guy's welcome back to our another blog today we are not going to draw but know five important points for to improve your drawing skill. For to draw realistic drawing there are few important point's which you must remember when you are going to draw realistic drawing. Basically here I will share points to imporve sketching. So let's understand each important points for to improve drawing skill.

Important points for to improve your drawing skill, how to improve drawing skills, ways to improve you drawing skills, 5 best ways to improve drawing skills, drawing sheet importance, why right drawing paper is important

1.Draw on good quality of drawing paper's

First you must know that the right drawing paper for sketching. Because it is very important for artist to know the which quality of paper he/she required for sketching. When artist know the quality of paper they easily able to increase the quality and give amazing look to their drawings. Also artist must know the material of paper, weight of the paper and surface quality of paper means you must know that on which quality of paper you have to draw.

Important points for to improve your drawing skill, how to improve drawing skills, ways to improve you drawing skills, 5 best ways to improve drawing skills, graphite pencils tips, why graphite pencils is important

2.Know different grades of Graphite pencils

Graphite pencils produced in many different grades which is having different-different lighter and darker shades. You must know which type of pencils you have to use and how much pressure you have put on pencils for getting different-different shades. Like you need to use 2b pencil for lighter shades and for darker shades you need to use 8b pencils.

3.Learn to draw proper outlines 

For making  realistic drawing first you need to make outline of stuffs then you will proceed for further process. So for to draw proper outline there is method called grid method. In grid method it take so much time but it will give accurate drawing and in freehand it will take less time but it's take time for accurate outline.

4.Draw on regular basis

For getting expert in realistic drawing you must need to make drawing on regular basis and this is time taking. Developing habit of daily sketching is the right way for improving drawing skill. For to do sketching daily you need to make schedule then learn drawing lesson step by step. Slowly-slowly increase you drawing time which increases you drawing skill rapidly.

5.Know the uses of drawing tools and material's 

For realistic drawing you must need to use some drawing tools and material's which is compulsory for realistic sketching. There are some tools like blending stump's, kneaded eraser,charcol pencils, and many more which is having certain uses in sketching. So kindly know the uses of all this tools for improving drawing skills.

So I hope you will understand all the important point's for to improve drawing skills. Also watch our another drawing tutorial and diy blogs for clear you doubt's.

                    Thank you for visiting us

Tuesday, 11 June 2019

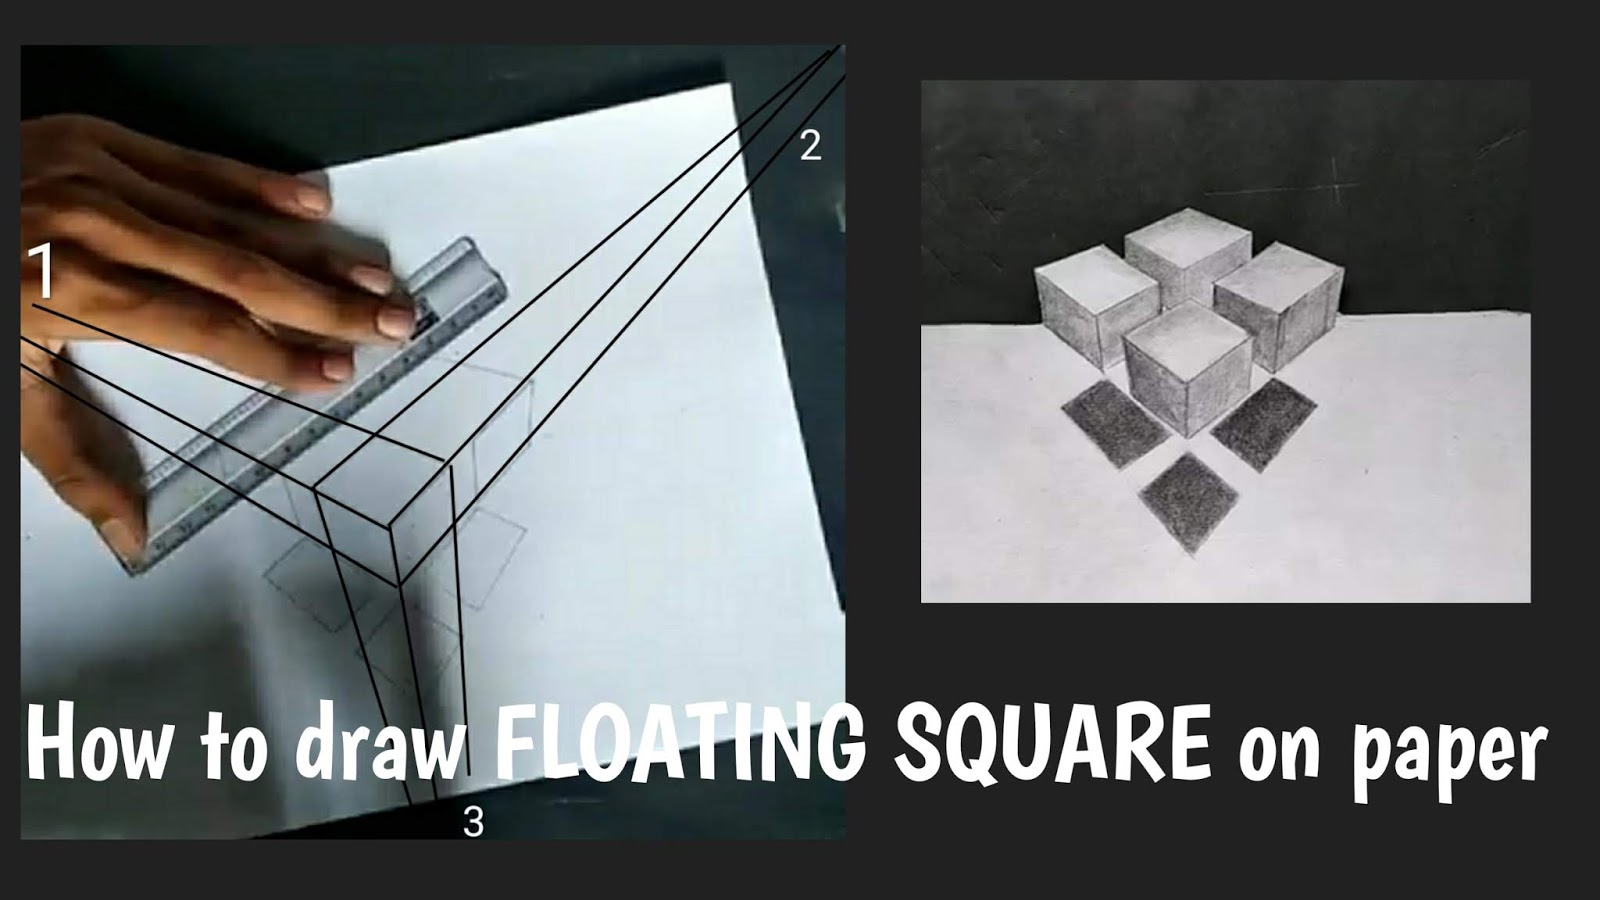
How to 3d floating squares shape boxes on paper - 3d drawing art

How to draw 3d Floating square on paper,  3d square drawing , 3d square drawing illusion, 3d drawing art, best 3d drawing, 3d sketch, 3d art on paper

Hey friend's, welcome back to our another drawing tutorial blog. Today we will learn to draw about on very interesting topic which is floating square boxes drawing on paper. This drawing tutorial is tough for those one's whose concept is not clear about prespectives drawing. So I suggest first please learn about prespectives drawing. Basically we made 3d square with the help of three point prespectives. Let's known the drawing tools first that we need to draw.

                 Drawing tools we need

1.Graphite pencils
2.Paperstumps
3.Scale
4.White drawing paper
5.Papercutter

                     Important points

These are some important points which we must take care when we were going to draw multiple square box on paper:
•Use scale for to draw lines from one point to to the another point.
•Use different grade of pencils for to add different texture on walls.
•Use paperstumps for to add smooth texture to the shadow so it's look realistic.
After knowing all this important points let's start to our step by step tutorial for to draw floating multiple square.

How to draw 3d Floating square on paper,  3d square drawing , 3d square drawing illusion, 3d drawing art, best 3d drawing, 3d sketch, 3d art on paper

1. First step: In the first step friend's we will take three point one at left, right or down. Draw two lines from one side first then draw two lines again from another side. It will give us square shape in 3d. After doing this step we draw lines from below the square from the point's. Then we take one point at downwards and draw lines towards to three sides of square. Now 3d shape started visible.

How to draw 3d Floating square on paper,  3d square drawing , 3d square drawing illusion, 3d drawing art, best 3d drawing, 3d sketch, 3d art on paper

2. Second step: In second step friend's we will draw small four square in the big square shape. So by following the same steps we draw square by making small gaps. Also draw square below the 3d shape for to make shadow texture.Then we erase the lines which is not the part of small square.

How to draw 3d Floating square on paper,  3d square drawing , 3d square drawing illusion, 3d drawing art, best 3d drawing, 3d sketch, 3d art on paper

3. Third step: In third step friend's our main work is to do shading of square. Here we use different grade pencils for to add different shades. So we use 4b pencils on one side and 6 on side side. At last we use paperstumps for to add smooth texture to shadow. 

How to draw 3d Floating square on paper,  3d square drawing , 3d square drawing illusion, 3d drawing art, best 3d drawing, 3d sketch, 3d art on paper

4. Fourth step: At last step friend's we will cut paper from the middle of square shapes. So draw straight lines in middle and cut with paper cutter by removing the upper parts of square. Now our drawing started to look in 3d.


So I hope friend's you will enjoyed and learn to draw to floating squares on paper. For more interesting drawing tutorial step by step follow us, and share our work with your friend's 


Thank you for visiting us

Sunday, 2 June 2019

How to draw Corn cob with Graphite pencils

How to draw corn cob, corn cob drawing, corn drawing , easy Drawing tutorial for kids, corn drawing for kids, drawing lessons, realistic drawing

Hey friend's, welcome back to our another drawing tutorial blog. Today we will learn to draw corn cob on paper with the help of graphite pencils. This tutorial is so easy and mainly for begginers. So before we start let's know the drawing tools we need for to corn cob on paper.

                    Drawing tools we need

1.Graphite pencils - 2b,4b,6b & 8b
2.Paperstumps
3.Kneaded eraser
4.White drawing paper

                      Important points

These are some important points which we must take care when we were going to draw corn cob:
•Draw outline of corn cob with light grade pencils like HB or 2b pencil.
•Use Kneaded eraser for to add details on corn cab.
•For proper outline you can use grid method otherwise draw with free hand.
After knowing all this important points let's start step by step tutorial.

How to draw corn cob, corn cob drawing, corn drawing , easy Drawing tutorial for kids, corn drawing for kids, drawing lessons, realistic drawing

1. First step: In first step friend's we will draw outline of corn cob. For to draw proper outline we use grid method but here I am drawing outlinewith freehand. You need to use light grade pencils and here I am using Hb pencils.

How to draw corn cob, corn cob drawing, corn drawing , easy Drawing tutorial for kids, corn drawing for kids, drawing lessons, realistic drawing

2. Second step: In this step friend's we will draw corns so for to draw corns we need to make lines from top to bottom parts according to the size of corn cob. Then made corn shape between the lines and corn should need to touch upper and lower line.

How to draw corn cob, corn cob drawing, corn drawing , easy Drawing tutorial for kids, corn drawing for kids, drawing lessons, realistic drawing

3. Third step: In this step friend's we will shade corn cob. For to do shading take 4b grade pencils and shade on husk part then we blend it with the help of paperstumps. Also we will shade corn with blending stumps and use eraser for add white lines on husk.

How to draw corn cob, corn cob drawing, corn drawing , easy Drawing tutorial for kids, corn drawing for kids, drawing lessons, realistic drawing


4. Fourth step: At last friend's we will will draker grade like 8b and add some drak details on husk and corn. Also we need to shade with 8b pencils at between corns.


So I hope friend's you will understand and enjoy the tutorial's. For more information you can watch our YouTube videos which clear your all doubts. Also don't forget to follow us.


Thank you for visiting us


Sunday, 19 May 2019

How to draw Baby Groot with pencils - step by step

How to draw baby groot with pencils, step by step groot draw, kids drawing, baby groot drawing for begginers, baby groot sketches, baby groot pencil drawing, avengers endgame drawing, groot drawing for kids

Hey friend's welcome to our drawing tutorial blog. Today we were going to draw baby groot with the help of graphite pencils on paper. Baby groot sketches look so tough but it's easier to draw by using the right techniques and methods of drawing. So before we start our step by step tutorial let's known the drawing tools we need for to draw baby groot.

             Tools and material's we need

1.Graphite pencils - 2b,4b,6b & 10b
2.Black charcol pencils
3.Paperstumps
4.White drawing paper
5.Scale

                       Important points

These are some important points which we must take care when we were going to draw baby groot with pencils:
•Draw major outline of groot first with the help of light grade graphite pencils.
•Use paperstumps for to give smooth texture on baby groot drawing. 
•Use grid method for to draw perfect outline of  baby groot realistic drawing.
So after knowing all this important point let's start our step by step tutorial.

How to draw baby groot with pencils, step by step groot draw, kids drawing, baby groot drawing for begginers, baby groot sketches, baby groot pencil drawing, avengers endgame drawing, groot drawing for kids

1.First step: First of all we need to make outline of baby groot. For to draw perfect outline use grid method otherwise you can use light grade pencils like hb or 2b pencils. You can also use mechanical pencil. First start draw with head then proceed for downwards according to the refrence images.

How to draw baby groot with pencils, step by step groot draw, kids drawing, baby groot drawing for begginers, baby groot sketches, baby groot pencil drawing, avengers endgame drawing, groot drawing for kids

2.Second step: In second step friend's we need to draw outline of eyes,mouth and leaves of baby groot then draw some smaller and bigger lines on baby groot face. For to draw lines you can use 2b pencils. 

How to draw baby groot with pencils, step by step groot draw, kids drawing, baby groot drawing for begginers, baby groot sketches, baby groot pencil drawing, avengers endgame drawing, groot drawing for kids

3.Third step: Now friend's we will do shading. For shading use 4b pencil on skin area and 6b on corner end side of lines. Then use paperstumps for to give smooth texture on drawing according to the refrence image. Also don't forget to shade leaves with blending stump's.

How to draw baby groot with pencils, step by step groot draw, kids drawing, baby groot drawing for begginers, baby groot sketches, baby groot pencil drawing, avengers endgame drawing, groot drawing for kids

4.Fourth step: At last step friend's we will use charcoal pencils. Draw some line patterns with charcol pencils on existing line. Then shade the eyes area with charcol pencils by lefting small circle shape at upper corner. It will gives us shining effect eye's on drawing.

So I hope friend's you will like it don't forget to follow us, for more information you can watch our Youtube videos.  

How to draw - 3d drawing, diamond , Popsicle sticks house, Rose drawing

Thank you for visiting us,follow us know


Wednesday, 8 May 2019

How to make house with Popsicle sticks - step by step tutorial with easy method

Popsicle sticks house, step by step tutorial, how to make home with Popsicle sticks, step by step tutorial for to make icream stick house, how to make home with ice cream sticks, easy diy, Popsicle sticks art

Hello friend's, welcome to our another interesting art and craft blog. Today we are not going to  draw but make house with Popsicle sticks with easy method. Mainly this tutorial is for begginers who wants to learn to make house with Popsicle sticks. So before we start let's know the tools and material's for to make house with Popsicle sticks.

            Tools and material's we need 

1. Popsicle sticks
2.Glue
3.Scissors 
4.Pencils
5.Wooden sticks
6.Scale

                      Important points

These are some important points which we must take care when we are going to make House with Popsicle sticks:
•Try to use strong glue or glue stick so you can't get trouble in sticking Popsicle sticks.
•We must need to imagine and draw the rough sketch of house so you can't get confused.
•Cut the gate and windows structure first it makes your work easier.
So after knowing all this important points let's start our step by step tutorial for to make house with Popsicle sticks.

How to make Popsicle sticks house step by step tutorial, how to make home with ice cream sticks, how to make house with sticks

1.First step: In first step friend's our work is to make ground surface for house. For to make ground surface we must need to cut the one part of sticks and here first draw line on stick of 15 cm making distance of 10cm and cut the rest part. Put stick in rectangular pattern also stick all the sticks with glue. Then at last we got two surface and we will stick both with glue form plane ground surface of length 20cm and 15cm breadth.

How to make house with Popsicle sticks, step by step tutorial, how to make house with ice cream sticks, art and crafts, diy, Popsicle sticks art

2.Second steps: In this step friend's  we will made side wall for house. So we arrange all sticks in pattern of rectangular shape. Here our size is 10cm length and 15cm breadth. Then stick with glue by putting stick with stick surface.

Popsicle stick house, how to make house with Popsicle stick step by step tutorial, Popsicle stick house tutorial, how to make home with ice cream sticks

3.Third step: In this step friend's we make front and backward wall of house. So here you must take care that you must need to cut triangular shape first  then stick all stick for making wall.
Here our length of stick 10cm without trianguler shape. At last draw structure of gate on one roof  cut with scissors.

Popsicle sticks house, step by step tutorial, how to make home with Popsicle sticks, step by step tutorial for to make icream stick house, how to make home with ice cream sticks, easy diy, Popsicle sticks art

4. Fourth step: At last we will put all walls at their place. First we put side wall first on ground surface and put stick in between stick with glue so it will give support. Then we will put front wall and back wall at place stick with glue. Now our last work is to make roof so for to make roof put stick at top then put glue on it stick Popsicle sticks on both sides.


Now friend's our house is ready for more information you can watch our Youtube videos.Also forget to follow us and share it with your Friend's.


Thank you for visiting us


Monday, 29 April 2019

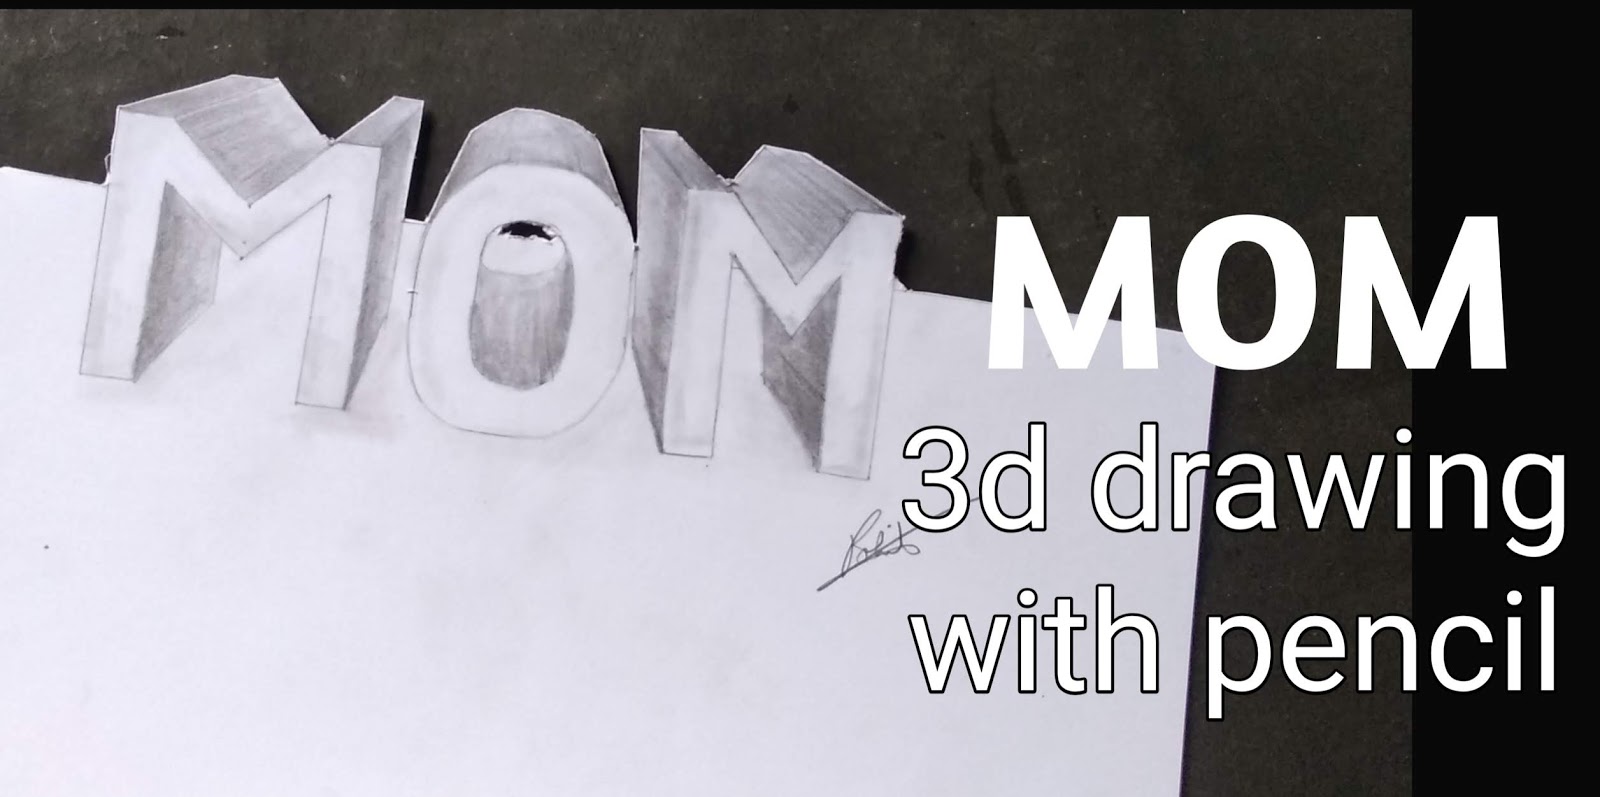
How to draw MOM in 3D - Mother's day drawing

Mother's day drawing, step by step tutorial, mom drawing with pencils, happy mother's day, Mother's day pencils drawing

Hello friend's once again welcome to our another interesting 3d drawing tutorial. As we know Mother's day is coming soon so I decided to day draw 'MOM' word in 3d on paper with the help of graphite pencils. You can use this technique for to write in mother's day greeting cards. So without wasting time let's start our step by step tutorial for to draw 'MOM' in 3d and first let's know  drawing tool's and material's we need.

                  Drawing tools we need

1.Graphite pencils - 2b,4b,6b & 8b
2.Paperstumps
3.Kneaded eraser
4.Scale
5.White drawing paper

                       Important points

These are some important points which we must take care when we were going to draw 'MOM' word in 3d:
•For to draw lines use scale and light grade pencils so you can erase your mistakes easily.
•Use one point perspective method for to draw word in 3d
•At last cut paper from middle and remove upper white paper by lefting drawing with lowder side paper.
So after knowing all this important points let's start our step by step tutorial.

Drawing 3d outline of mom word,Mother's day drawing, step by step tutorial, mom drawing with pencils, happy mother's day, Mother's day pencils drawing

1.First step: In first step friend's we will draw outline of 'MOM' word with the help of mechanical pencil or hb pencils.  Here I have drawn rectangular box then divide into three equal square parts. Two square box for M word and one for O and draw by following the above image.

Mom drawing with one point perspective,Mother's day drawing, step by step tutorial, mom drawing with pencils, happy mother's day, Mother's day pencils drawing

2. Second step: In second step friend's we will draw line from the corner point of word to the one point. You need to take one point at above of Mom word  but lines should be not more than 2cm. Also draw line above 'MOM' word and never draw line above this line. By following this trick you will get 3d outline of 'MOM' word. 

Shading mom word, Mother's day drawing, step by step tutorial, mom drawing with pencils, happy mother's day, Mother's day pencils drawing

3. Third step: In this step friend's we will do shading of 'MOM' word. For shading use 4b and 6b pencils. Shade with 6b pencil at the between lines drawn with one point prespectives  and blend it with help of paperstumps for smooth texture.

Mother's day drawing, step by step tutorial, mom drawing with pencils, happy mother's day, Mother's day pencils drawing

4. Fourth step: At last we will cut paper with scissors. Draw line in middle of 'MOM' word then cut with the scissors by lefting drawing with the lower part. Also don't forget to draw shadow texture for 'MOM' word with the help of paperstumps.


So I hope friend's you will enjoy it and don't forget to follow us. Watch our Youtube videos for more information.


Thank you for visiting us, follow us now


Featured posts

Essential Drawing Tools and Materials for begginers - Top 10 list

    Basic drawing tools and accessories for begginers - by Art of Rohit  Hello friend's, today I will tell you and discuss about b...

Popular posts